Tuesday, December 31, 2013

Crackle, Emboss, Rub

Hello everyone!  Debbie here today to share a layout I made with several Leaky Shed Studio Chipboard pieces. Keys, Corners, Crowns and Frames are the perfect embellishment for this layout!  At one time in my mother's life she spent the year as a beauty queen...what girl wouldn't love this!  Our daughters and grand daughters play dress up and their first wish is to be a princess!  The chipboard I used on this layout is perfect for a princess of any age!


This technique is very easy to achieve.  Here's some simple directions and products you will need to finish your chipboard.

1. Gold Crackle - Viva
2. Versa Mark Ink Pad
3. Glittery Embossing Powder
4. Inka Gold - Viva in Antique Silver

Start out by painting your chipboard with the Gold Crackle.  I gave mine 2 coats. When your Crackle is dry, rub your pieces with Versa Mark clear ink and the sprinkle your favorite embossing powder on and hit it with the heat gun until it's all melted.   Rub your Inka on to highlight. 

That's it!!!  Embellish as you choose!

Thanks for stopping by the Leaky Shed Studio today!!

Debbie

Monday, December 30, 2013

Adorable Enameled Chipboard Title

When I began to create this scrapbook layout, I knew immediately that I would be using the "Adorable" Leaky Shed Studio chipboard piece as my title. One look at my "adorable" niece and you can see why...the title fits her perfectly.

Adorable You Layout by Juliana Michaels

I love chipboard, and nothing is more fun than taking a blank piece of it and making it my own. For this piece, I used a fun, "new to me" product by Stampendous called Frantage Embossing Enamels. These powders contain a mixture of colors.

Adorable You Layout by Juliana Michaels detail

The one I used here has a combination of white, pink and gold that adds a little touch of bling. If you have never tried embossing powders, I would highly recommend these. They are such a fun and easy way to dress up and add your own personal touch to any of the fabulous chipboard by Leaky Shed Studio.

For a complete list of supplies and other details about my layout, please feel free to stop by my blog 17turtles.

HUGS,

Leaky Shed Studio Supplies:

Friday, December 27, 2013

A layout with our Iron Leaf Corner

Hi everyone, Maggi here.  Ahhhh, Christmas has come and gone.  I love Christmas so much, yet I'm always glad when its over.  Now its time to take all the decorations down.  Ugh, I don't like that part of Christmas at all!

Well, instead of cleaning up all the Christmas mess, I decided it was time to have some fun doing something completely unrelated to the holidays and for me that usually means digging into my Graphic 45 stash.  I used the G45 Couture collection which has images that really remind me of the art deco age and I thought it would go perfectly with our Iron Leaf Corner which also looks very art deco to me.

I am a scrapper that has a really hard time leaving blank space on a layout.  I definitely subscribe to the more is better theory!  So, I just love corner chippies, they are great for filling in space.  I love the detail etching in our Iron Leaf Corner so I chose to just mist the corner with Lindy's Golden Lump O' Coal which gave the chippy a lovely golden black shine and did not cover up the beautiful etching.


 I made the flowers using Sizzix's Tattered Floral die and I  rolled the small roses that I diecut with a La La Land die. 


I fussy cut some roses and leaves from the Couture collection and then I used Heartfelt Creations Bella Rose stamp to make more leaves that would look like the collection leaves.

On the right you can see a couple of the Bella Rose stamped leaves, they do look alot like the ones I fussy cut in the photo above don't they?


Really just a few layers of paper, some fussy cutting, a great piece of chipboard, and voila, a fun layout!  

Supplies - 


  Graphic45 Couture 12 x 12 and  6 x6 paper pads 
 Alterations Tattered Floral, La la Land rolled roses,
  Distress Fired Brick, Black Soot
 Lindy's Creme Brulee Cream,  Golden Lump O' Coal
 Prima SIIS flower centers

Thanks for stopping by and don't forget to make yourself some "me" time!


Tuesday, December 24, 2013

Family Tree Words and Marion Smith Garment District


Maggi here to show you some great word chippies from Leaky Shed and on this layout I've used some from the Family Tree collection, "Families are Forever". I painted the chipboard pieces with Emperor's Gold Silks and then lightly brushed on a little Pink Grapefruit on the chippies and the flowers just to tie everything all together.

I used Marion Smith Designs newest collection, Garment District. It's full of vintage colors and images that I love so much! I even dug out my sewing machine to tie into the collection's title! I stamped here and there with some pink paint and coffee archival ink. If you look closely you can see that I used a doily mask and Lindy's mist.


Supplies:

Marion Smith Designs Garment District: 
Prima Engraver fabric flowers, Prima Bellas, Petaloo velvet hydrangeas sienna,
Distress Walnut Brown, Archival ink coffee


Lindy's Winter Jasmine Gold  mist
TCW, Prima Lace Doily #3 masks
 Ayeeda Gesso
Splash of Color Silks Acrylic Glaze Pink Grapefruit, Emperor's Gold, 

Claudia Hellmuth Painterly Pink

I want to wish everyone that celebrate's Christmas a very Merry Christmas and a  wonderful day tomorrow.  I hope you are able to spend time with those you love!


Monday, December 23, 2013

Love Notes Card Holder Set Featuring Enameled Chipboard

It's Tracey here to share a new project with you. It's always fun to send little notes to our loved ones to let them know how much we care, or to congratulate them on a special accomplishment. I've created a set of note card holders just for that purpose. I've cut the holders and coordinating note cards from the Prima Romance collection and decorated them with gorgeous Leaky Shed Studio chipboard.

Love Notes Set

Tips and Techniques
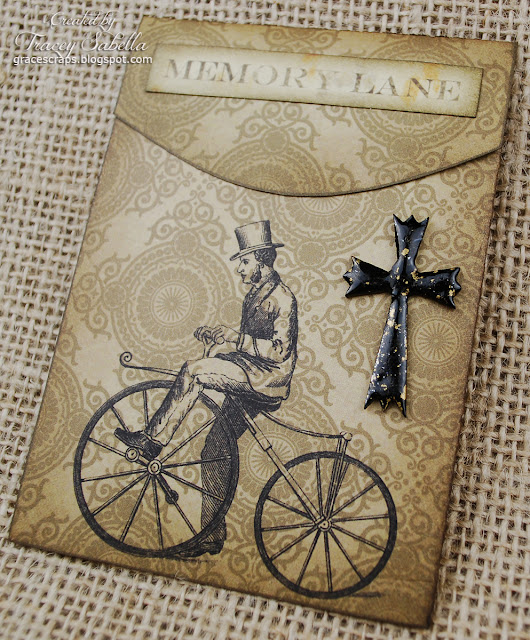
This first note card holder has a steampunk image, so I added one of the LSS crosses from the cross set. I heat embossed with with the wonderfully textured Fran-tage Aged Black Embossing Enamel. Each of these holders was fussy cut from design sheets from this gorgeous Prima paper, then scored and folded. Edges are inked in Walnut Stain Distress Ink. 

For each of these holders I cut out and inked additional sentiments like the Beautiful and Notes sentiments on this one. The Leaky Shed Studio Butterfly was heat embossed with Fran-tage Shabby Pink Embossing Enamel. Inking for this holder is done with Black Soot Distress Ink. 

This chipboard piece is the new Damask design that is an upcoming release. Don't you just adore the intricate detail? It's also heat embossed with Fran-tage Embossing Enamel in Aged Silver. The top part of the chipboard is not glued down so the envelope tab can be tucked underneath. I went back to the Walnut Stain Distress ink for this note holder. 

You may have noticed that I have not included much dimension with flowers and other embellishments so that they will be easy to slip into an envelope and send on their way, but still have so much elegant and gorgeous dimension with the lovely dressed up chipboard. 

Leaky Shed Studio Products
Spring Butterfly Small (Set of 3)
Cross Set (Set of 5)
Damask - small

A full list of supplies used for these note card holders will be available
on my blog, Garden of Grace, on Tuesday.

I hope you've been inspired to add some Leaky Shed Studio chipboard to your next project!

Be sure to stop back tomorrow to see a fabulous layout designed by Maggie Harding.

~ Blessings ~

Tracey

Friday, December 20, 2013

Step by Step card.

Hello everyone. Tiffany here. 


I have a card to share with you. I made this card using the 75Cent collection from Kaisercraft. I used the Butterflies from Leaky Shed and Also the Ornate corner

You can find out more details on how I made the card in this video below.


Here is another photo of the card. 


Stay connected. 

Thank you for stopping by. 


Thursday, December 19, 2013

Happy Holidays!

If you haven't had a chance to play with the new Leaky Shed Studio ornaments and snowflakes, you're missing out. They are so much fun. Today I used the Teardrop Frame ornament along with one of the small snowflakes to make a card just for you!

Just like Debbie said on Tuesday, I enjoy hand-making my Christmas Cards as well.  
So.... I made this one for all of you.

Whatever you might be celebrating this holiday season, I hope you and yours enjoy each other and all the fun memories that are made this time of year!

(I left the card open so you could see how the snowflake would twirl if you could touch it.)

I used acrylic paints and glitter glue to paint my chipboard.  
I cut the center out of my card and attached the snowflake with a small string of nylon string so it would twirl when the card was opened.

Enjoy the season!  ♥Kris

Supplies used:
Teardrop Frame Ornament
Six Snowflakes
EP Tis the Season Collection

Wednesday, December 18, 2013

Julie Nutting Classy Mixed Media Canvas

Hi everyone, welcome to the Leaky Shed Studio blog! I recently shared a Julie Nutting Princess Canvas I created using the Princess 8" Doll that I made as a Christmas present for my niece. At that time, I mentioned that I would be sharing a second canvas I made for my other niece. I used many of the same techniques to create this canvas as I did my first one and if you are interested in a detailed tutorial you can visit my blog 17turtles.

Julie Nutting Beautiful You Canvas by Juliana Michaels

This canvas was created using the Julie Nutting Classy 8" along with the Ring Frame Large.  I once again painted the frame using a Krylon Silver Leafing Pen and then added glitter to the edges for some extra shimmer and bling.

Julie Nutting Beautiful You Canvas by Juliana Michaels detail

I love playing and creating with these dolls, especially the 8" dolls. Because they are larger in size than the 4" dolls, they are a little easier to work with. I once again created a paper pieced dress from patterned paper using the tutorial I have posted on my blog.

Julie Nutting Beautiful You Canvas by Juliana Michaels detail

As I created both of these canvases, it reminded me of how much I used love playing with my dolls when I was a little girl. I think, I still have a bit of that little girl inside me who loves to play with her dolls!
 Julie Nutting Beautiful You Canvas by Juliana Michaels detail

It is so much fun to add the little details...all the way down to her silver shoes.

Thanks so much for stopping by today!
HUGS,

Leaky Shed Studio Supplies:

Tuesday, December 17, 2013

Leaky Shed Studio and Christmas

Hi everyone!  Debbie here today to share a card I made using the Small Flower Corner!  I love making my own Christmas cards and these photo corners by the Leaky Shed Studio are the perfect size to add to your cards! 

I sprayed the corners with Dylusions mist and then added the flower to the corner.

Are you making cards this year?  We'd love to see them!

Be sure to stop by the Leaky Shed Studio and check out all their new releases...Here are some of them that are sure to get your Creative Christmas juices flowing!!

 Six SnowflakesTeardrop Christmas OrnamentSnowflake Scroll Christmas OrnamentImage 1

Thanks for stopping by the Leaky Shed Studio Blog today!!

Debbie


Monday, December 16, 2013

An altered cigar box, flower corner, and Julie Nuttig doll

Hi there, Maggi here to share with you my most favorite project of late, an altered cigar box.  I have to thank my good friend, Jen aka jrabs for giving me this fabulous wooden cigar box.  The moment I saw it I knew it would be altered with something from Graphic 45!!  Well when Couture came out, I literally swooned, it was the perfect collection to use for altering my box!

I used two Leaky Shed chippies on the box.  The cover has a small flower corner chippy  that I've embossed with Stampendous Aged Black embossing enamel.  It fits perfectly on lid of my box.


 Top/side view

Top

Leaky Shed small flower corner embossed with Stampendous aged black embossing enamel.


Inside view.

What could be more perfect with the Courture collection than a Leaky Shed 4" Julie Nuttig doll,  Spooky.  Her dress is done with Stampendous marcasite embossing powder.  I love the sparkly effect it gives.

These dolls are just so cool and work with so many things, tags, layouts, cards and altered items!!


Supplies:


Graphic 45 Couture collection
Petaloo Mixed Textured Blossoms
Idea-ology knob
Webster's Cameo

More closeups and details about how I made the box will be up on my blog tomorrow.  I hope you'll stop by!


Friday, December 13, 2013

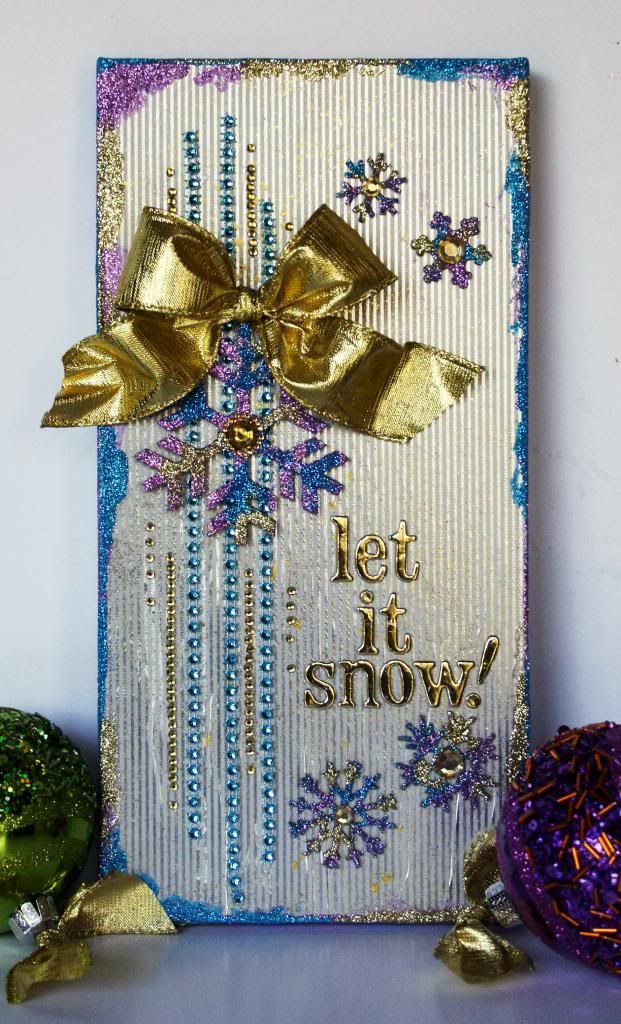
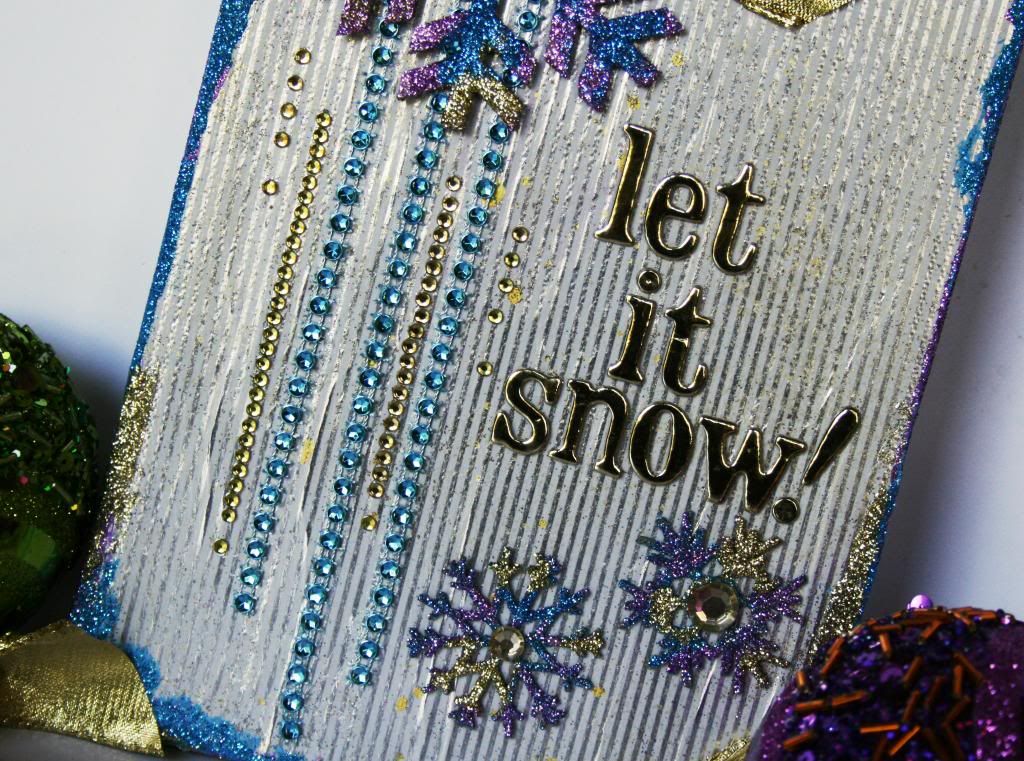
Let It Snow Canvas

Hi everyone!  It's Robbie today with a little canvas that I made using some of the new Winter release chipboard pieces.

Let It Snow

I have been into purple and blue lately because my daughter's apartment is decorated primarily in purple, blue and gold.  I love these non traditional colors for Christmas projects and especially for winter projects.


The background of this 6x12" canvas is covered with a  piece of wrapping paper.  I just used Mod Podge to adhere it, then gave it a light mist of Color Shine.  The paper is silver and white, but I knew that I wanted to add gold as the primary metallic color.

I really love the idea of using wrapping paper for things that will sit out during the holidays.  In my case, I only buy what I love and what co-ordinates with my decor.

Tip:  Ok... weird tip for today!  If you want AWESOME wrapping paper, try TJ Maxx, Marshalls or Home Goods.  They are all owned by the same company and they have the BEST foil papers!!   They are also really inexpensive compared to buying them at other stores.  :)


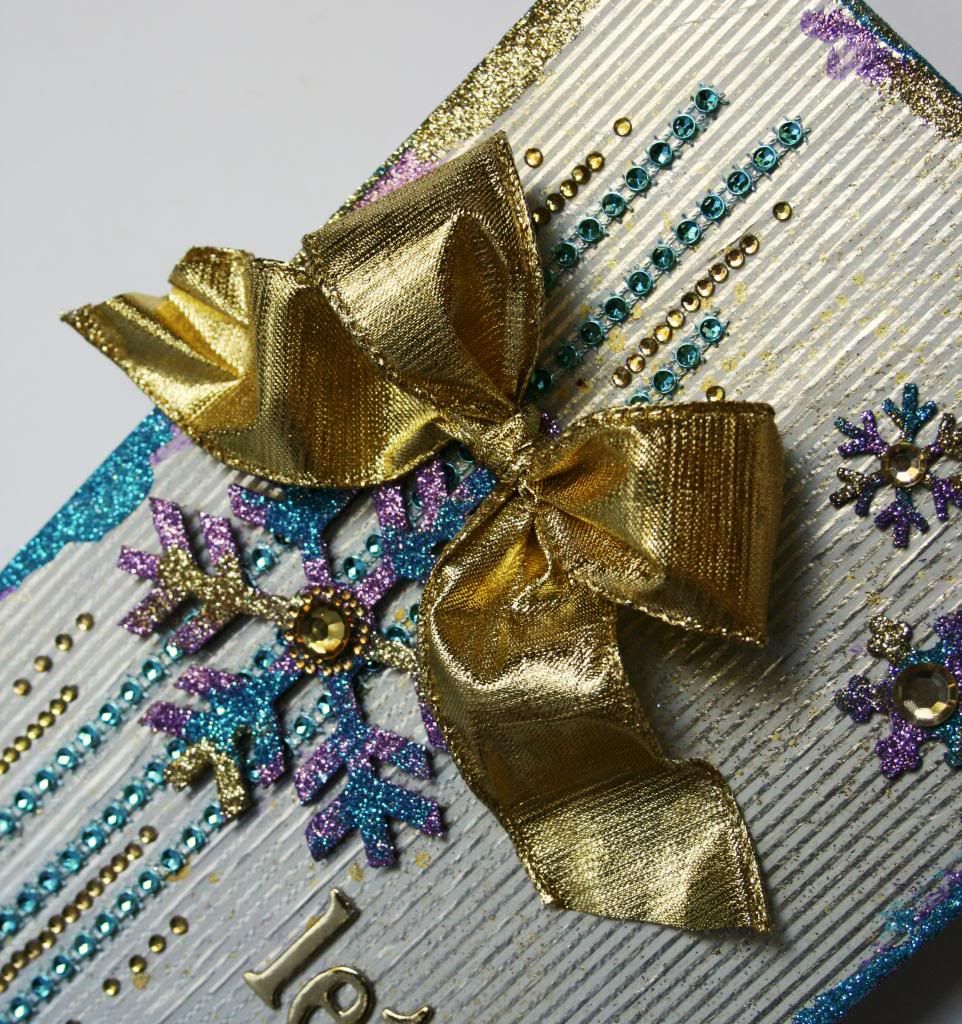
You can see in the close-up that this is a really glittery project!  Be prepared to get covered!  

I first put purple glitter on the entire snowflake.  After it was dry, I just took my paint brush and dabbed in a few places with glue and added the blue glitter.  Repeat the same process for the gold glitter.

I also did the edges the same way.  I did use purple paint, but decided that the glue worked better.  


For the bling in the background, I just glued the blue trim down and then added adhesive jewels.   I also added some jewels in the center of the snowflakes.  

Finish the project off with a sentiment and a bow.  Actually a really easy and quick little sign to set out during the winter.  

Tip:  Since I am giving shopping tips for this post, I thought I would let you know that I picked up the trim at Michaels for $1.   They have several colors in the $1.50 spot, but always dig a bit in the dollar ribbon bin.  You never know what you might find.

Of course, while you are shopping make a stop by the Leaky Shed Store!

Supplies Used:
Six Snowflakes 907-42 
Snowflake Ornament

Thanks for stopping by and be sure to check us out on Facebook and share your creations! 


Thursday, December 12, 2013

Grungy Textured Christmas Ornament Tag

It's Tracey here to share my latest project with Leaky Shed Chipboard. Winter is in the air here in Ohio as I bring you another Christmas project featuring one of the new release Christmas ornaments now available in the Leaky Shed Studio Store

"Peace on Earth Tag"

Tips and Techniques
I thought I'd change things up and go with a grungy home spun feel to decorate my ornament. I started with the snowflake, using a paint brush to cover it with Jasmine Mix'd Media Inx. This ink stays wet for a long time and is my go to ink when embossing. While wet, I covered with Fran-tage Shabby White embossing enamel and heat set. I love the mix of colors and lumpy, grungy texture that this enamel provides.

Next, I painted the scroll work with a deep red metallic paint. When dry I covered it with Ranger Clear Rock Candy Distress Crackle Paint. When dry, I rubbed on brown ink to bring out the crackled texture. The outer rim is painted in gold metallic paint, then rubbed with brown ink.

I started with a plain manilla tag and used a combination of techniques to create this grungy gift tag as a backdrop for my ornament. Stop by my blog, Garden of Grace, tomorrow for all the details. Wendy takes great care when packaging her chipboard and some of my chippie packages were tied together using jute twine. I have a confession to make. I keep all those bits of twine and used one of them to tie a simple bow at the top of my tag to hang the ornament. I wanted something simple so it will be easy to remove the ornament to hang on the tree. 

Leaky Shed Studio Chipboard:

Thanks for stopping by and be sure to come back tomorrow
to be inspired by a project designed by Robbie Herring!

~ Blessings ~

Wednesday, December 11, 2013

A quick tags project!

Hi there, Maggi here with today's quick little project!  Its that time of the year when quick is always a good thing and practical is even better!  Of course I ran out of gift tags when wrapping gifts so the debate was whether to run to town or make my own.  It wasn't much of a debate since it was pouring down rain and who wants to go out in that?  Mind you, I am not complaining since so much of the country is suffering from ice and snow storms.

So I thought about this package of blank tags from Leaky Shed that I have and thought they would be just the perfect size for making To/From tags!


I gave each tag a quick coat of paint with Viva Maya Gold paint as a starting point.  (This is wonderful paint, it has a metallic base and sparkles so pretty.)  Then I rummaged around and found some little stickers and tiny Petaloo poinsettias and adhered to my tag and presto, a cute little gift package tag!


I fussy cut the gingerbread man and popped him up, added a couple little stickers and doodled around the edges with a white Sharpie paint pen!


I stamped the Christmas tree image and sprinkled with silver embossing powder, added some red stickles for the ornaments, and then added glass glitter around the edges.


Another one done with a sticker, poinsettia and a bit of glittered foliage from Michael's floral department.

 On this one I glued and offset a  round tag behind the square tag just to add a little interest.  I used a Martha Stewart holly punch for the foliage and outlined with a gold pen.


So time invested?  About a half hour!  That's my kind of project for this time of year when there's so much to be done!  I am sorry for the poor quality photos, it's been gloomy and rainy here for the past several days and its still raining!  The camera is picking up the sparkle highlights in the paint and making it appear rough when actually it is a smooth beautiful finish like the red on the gingerbread man tag.

Supplies:

Viva Maya Gold
Sharpie paint pen
Graphic 45 Christmas stickers - asst collections

Thanks for stopping by!