Showing posts with label Clock #2 Small. Show all posts

Tuesday, May 5, 2015

Grungy Guy Card by Tracey S.

It's Tracey back to share my latest Leaky Shed Studio project with you. While I adore creating feminine, girlie grunge style projects, there's nothing like a grungy masculine card for the men in my life. Leaky Shed Studio has some fabulous pieces that are so perfect for guy cards. Today I'm sharing the birthday card I created for my amazing husband, Gary.

I've gone to my stash and most of the items used have been in my possession for a while. I hope you'll play along with our "Use Your Stash" Challenge. Scroll down for all the details.


Tips and Techniques
It's so easy to give a grungy metallic finish to these Leaky Shed Studio Watch Parts by heat embossing with Fran-tage Aged Black Embossing Enamel. I've mixed in some metal elements to span across the card.

I adore the way the etched lines in this intricate Key Hole stay visible when heat embossed. I combined a base of bronze enamel, then sprinkled lightly with super fine black and reheated.

I used the same technique for the Key and alcohol ink on the metal sentiment.

Here's a view to see both the key and keyhole. I've also added a pair of Leaky Shed clock hands below the sentiment, enameled the same as the Watch Parts. The background is painted with transparent crackle, dry brushed with white gesso, then spritzed with mist to accent the cracks. 

Thanks so much for stopping by today!
I hope you'll grab some Leaky Shed Studio chipboard and join our "Use Your Stash" Challenge.

Here is the challenge to you!
We at LSS want you to create a project using stuff from your stash and some Leaky Shed Studios chipboard and Leaky Shed Studio will send out a prize!  

To play just post a link to your blog post of your project using your stash and Leaky Shed Studio chipboard in the comments section before May 21st and we will draw a winner ...

AND if you want to earn an extra entry - share your project on our Facebook page!
The winner will be announced on the Leaky Shed Studio Facebook Page and the winner has 14 days to claim their prize! 


LSS Products

Please stop by my blog Wednesday for a complete product list HERE.
~ Blessings ~

Thursday, April 16, 2015

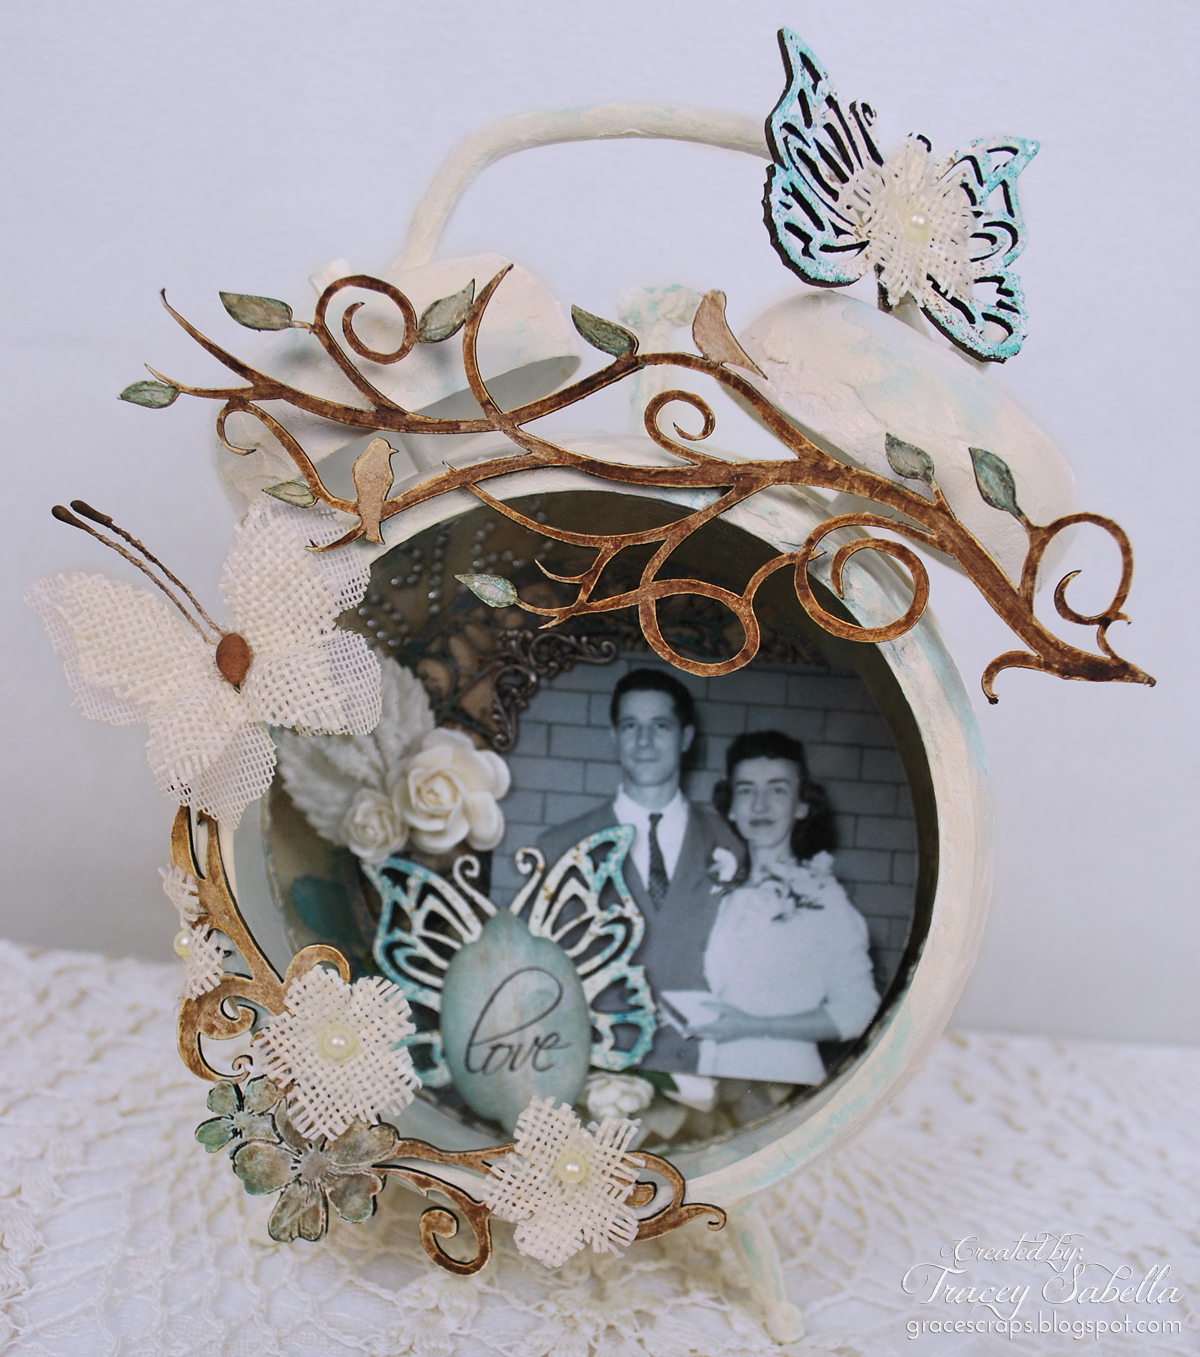
Altered Clock with Leaky Shed Studio Chipboard by Tracey Sabella

It's Tracey here to share an altered clock I created featuring gorgeous Leaky Shed Studio chipboard. This is a gift for a sweet friend who will be getting married in June. Her grandparents were an important part of her life. She wanted a special memento to display representing their presence on her wedding day. 


Tips and Techniques
Here's a photo of the inside of the clock. I adhered the photo and elements to the back panel which I had gessoed, covered with crackle paste, then colored with Lindy's Stamp Gang mists.

I've used the gorgeous Clock #2 (small) behind Mandy's grandparent's photo. I had extra teal mist in my craft mat and rubbed the clock across the splattered mist to color. When the mist was dry, I rubbed with several colors of metallic paint in teal and gold.

The Leaky Shed Spring Butterfly (small) comes with three sweet butterflies per set. I've heat embossed this one with Fran-tage Aged Ivory embossing enamel, then lightly on the edges with Iced Enamels turquoise Relique (embossing) Powder. I stamped and die cut the love sentiment layered as the butterfly body.

Don't Mandy's grandparents look so happy and in love?

I trimmed down the Leaky Shed Studio Harja Flower Eins flourish and colored it with Lindy's Stamp Gang mists. Layering once color over another results in the color variations seen on the flowers. I adhered several burlap flowers around the flourish since Mandy's using burlap in her wedding decor.

The clock was painted with several coats of gesso then using a palette knife to apply crackle past to the surfaces of the clock. Here I was looking for a peeling paint effect. I brushed with watered down mists to color.

The natural topper for this sweet clock would have been a heart flourish, however, one of Mandy's favorite childhood memories with her grandmother was counting birds, so I just had to use this charming Leaky Shed Studio Bird Branch chippboard. I've painted the piece with white gesso, then brushed on several shades of Lindy's mists to color. The butterfly is created just like the one previously described, then centered with another of the tiny burlap flowers.

Here's a side-view giving you another angle of these sweet chipboard pieces!!

Thanks for stopping by today!!
I hope you'll try Leaky Shed Studio Chipboard
on your next altered project!


Leaky Shed Studio Products
Bird Branch

Please stop by my blog Friday for a complete product list HERE.

Friday, August 8, 2014

3 Different Looks Using Embossing Powder on Chipboard ~ Tracey Sabella

Hello, It's Tracey here to share an engagement layout of a sweet couple who just got married last weekend. I created this to frame as a wedding gift for them. I've featured gorgeous Leaky Shed Studio chipboard around the page.

"Never Let Me Go"

Tips and Techniques
Mixed Media Wedding Layout by Tracey Sabella for Leaky Shed Studio - Embossed Chipboard
As you look at the three gorgeous Leaky Shed Studio Chipboard pieces I've used on this layout, you'll see three different looks. Here are the details.

To achieve this shabby look on the Leaky Shed Studio Harja Flourish - Two chipboard, I first adhered mica pieces randomly here and there with glue. I then applied Perfect Medium (Any embossing pad should work) and sprinkled on Fran-tage Shabby White Embossing Enamel. I left some of the areas only lightly covered so the chipboard and mica chips would show through, then heated the powder to melt.

It's the perfect leafy corner to this flower cluster.

Mixed Media Wedding Layout by Tracey Sabella for Leaky Shed Studio - Embossed Chipboard
Here's another view. You can see how I've gessoed the flowers to soften them.

Mixed Media Wedding Layout by Tracey Sabella for Leaky Shed Studio - Embossed Chipboard
Here's a close-up of the Leaky Shed Studio Double Heart. I've colored it with Blackberry Cordial Glimmer mist, then when dry dabbed lightly with Perfect Medium and lightly sprinkled with Fran-tage Shabby White Embossing Enamel before heat setting. I just used a very small amount of embossing enamel so the purple would remain the main color. 

I've stamped flourishes at the corner before topping with a BoBunny Flourish.

Mixed Media Wedding Layout by Tracey Sabella for Leaky Shed Studio - Embossed Chipboard
Leaky Shed Studio has some of the most beautiful and intricate clocks. This is the Small Clock #2. I've simply misted it to color and then topped with an opaline embossing powder for a pearlescent shimmer. 

I've splattered purple and gold across the page for shabby texture.

Mixed Media Wedding Layout by Tracey Sabella for Leaky Shed Studio - Embossed Chipboard
I've tucked the clock amongst the layers above the photo.

I hope you've been inspired to grab some Leaky Shed Studio Chipboard for your next layout!


Leaky Shed Studio Products

For a full list of products used, stop by my blog, Garden OfGrace, tomorrow (Saturday).

Thanks for stopping by today!

~ Blessings ~

Friday, February 14, 2014

Love Layout with Chipboard Stained Glass Window Tutorial

Happy Valentine's Day to all our Leaky Shed Studio followers!!

It's Tracey here to share a special Valentine's project. I created a layout with a love theme ~ the love our sweet daughter, Elizabeth, felt on her wedding day. 

I've used a number of Leaky Shed Studio Chipboard pieces, but really wanted to showcase the Prairie Grass stained glass window piece ~ so perfect to go with this lovely photo of Elizabeth standing in front of a stained glass window at the church. 

"You Are Loved"

Tips and Techniques
This gorgeous chipboard is the Prairie Grass piece. Details on how I created my stained glass window can be found in my tutorial below. 

Here I've used the Small Spring Butterfly. To get these delightful layers, I soaked it in warm water until thoroughly wet, then carefully split each wing into three layers and left the body intact. I painted it ecru, dried, then brushed Stickles across the wings. Several rhinestones on the body finishes it off.

A mix of flowers dry brushed with gesso and layered die cut leaf flourishes which were inked and then dry brushed with gesso. You can see a couple layers of punchinella I've tucked under and around my photo.

Another view of this sweet cluster.

Leaky Shed Studio has a wonderful collection of clocks. Here I've used the small Clock #2 and watch parts. They were simply painted with metallic paint, then randomly rubbed with Ebony Rub'n Buff. Finally, I dry brushed them with Gesso. A Prima heart gear was a perfect fit for the center of the clock!

This lovely flower cluster flows right on out over the edge of the window.

There was a white spot in the photo where the sun was streaming through the window. It looked bare on this black and white photo, so a cross from the cross set was just perfect to fill the space. You can see more of the goodies I tucked around the photo like this Abaca Ribbon and painted chicken wire. 

Now, here's my tutorial for the Stained Glass Window. 

Stained Glass Window Tutorial

Supplies List
Leaky Shed Studio ~ Prairie Grass
Acetate sheet or large scrap of acetate packaging
Ranger Crackle Accents
Stampendous ~ Fran-tage Embossing Enamel - Aged Silver
Ranger Alcohol Ink and felt applicator
Ranger Perfect Medium or other clear Embossing pad
Scissors to cut Acetate

Step 1. Cut a piece of crafting acetate or clear packaging to the width of the window piece. Place the acetate over the back of the chipboard piece and mark a cutting line for the top of the window. I used a Sharpie. Trim the top on the marked lines. 

Step 2. Heat emboss the window chipboard piece with embossing powder to coordinate with your project. I used Fran-tage Aged Silver Embossing Enamel.

Step 3. Apply a thin bead of Crackle Accents to the back of the chipboard. 

Step 4. Adhere the chipboard to the acetate by placing the back of the chipboard covered in Crackle Accents onto the front of the trimmed acetate. Don't worry if some of the Crackle Accents oozes out onto the acetate since in the next step you will be covering the window in it. 

Step 5. Apply a layer of Crackle Accents into each "window." ***Hint*** You do NOT want to completely fill the windows to the brim. Just a thin coat across the acetate, making sure to completely cover the entire surface. I removed the occasional larger bubble with a needle, however I did not worry about the tiny ones. I figured the bubbles would give the look of vintage glass. 
Step 6. Set aside to dry and crack. I allowed mine to sit overnight. 

Step 7. Apply alcohol in in the color of choice to the back of the acetate. I used a light pink. Because I used a monochromatic color scheme on my page, I kept my window the same color throughout; however, you could brush the alcohol ink on in different colors, using the chipboard frame as a guide. 

It just takes a few moments for the alcohol ink to dry and your Stained Glass Window is ready to use. 

Hint - to adhere to my page, I cut very thin strips of Crafty Power Tape and placed them on the back, lining it up with the chipboard so it isn't visible on the front side of the piece.

Here's how it looks on my page:

Leaky Shed Studio Products
Prairie Grass
Clock #2, Small
Watch Parts
Spring Butterfly Small
Cross Set

Thanks for stopping by today.
I hope you've been inspired to try your hand at creating one of these Stained Glass Windows.

~ Blessings ~