Showing posts with label Spring Butterfly Small. Show all posts

Thursday, April 16, 2015

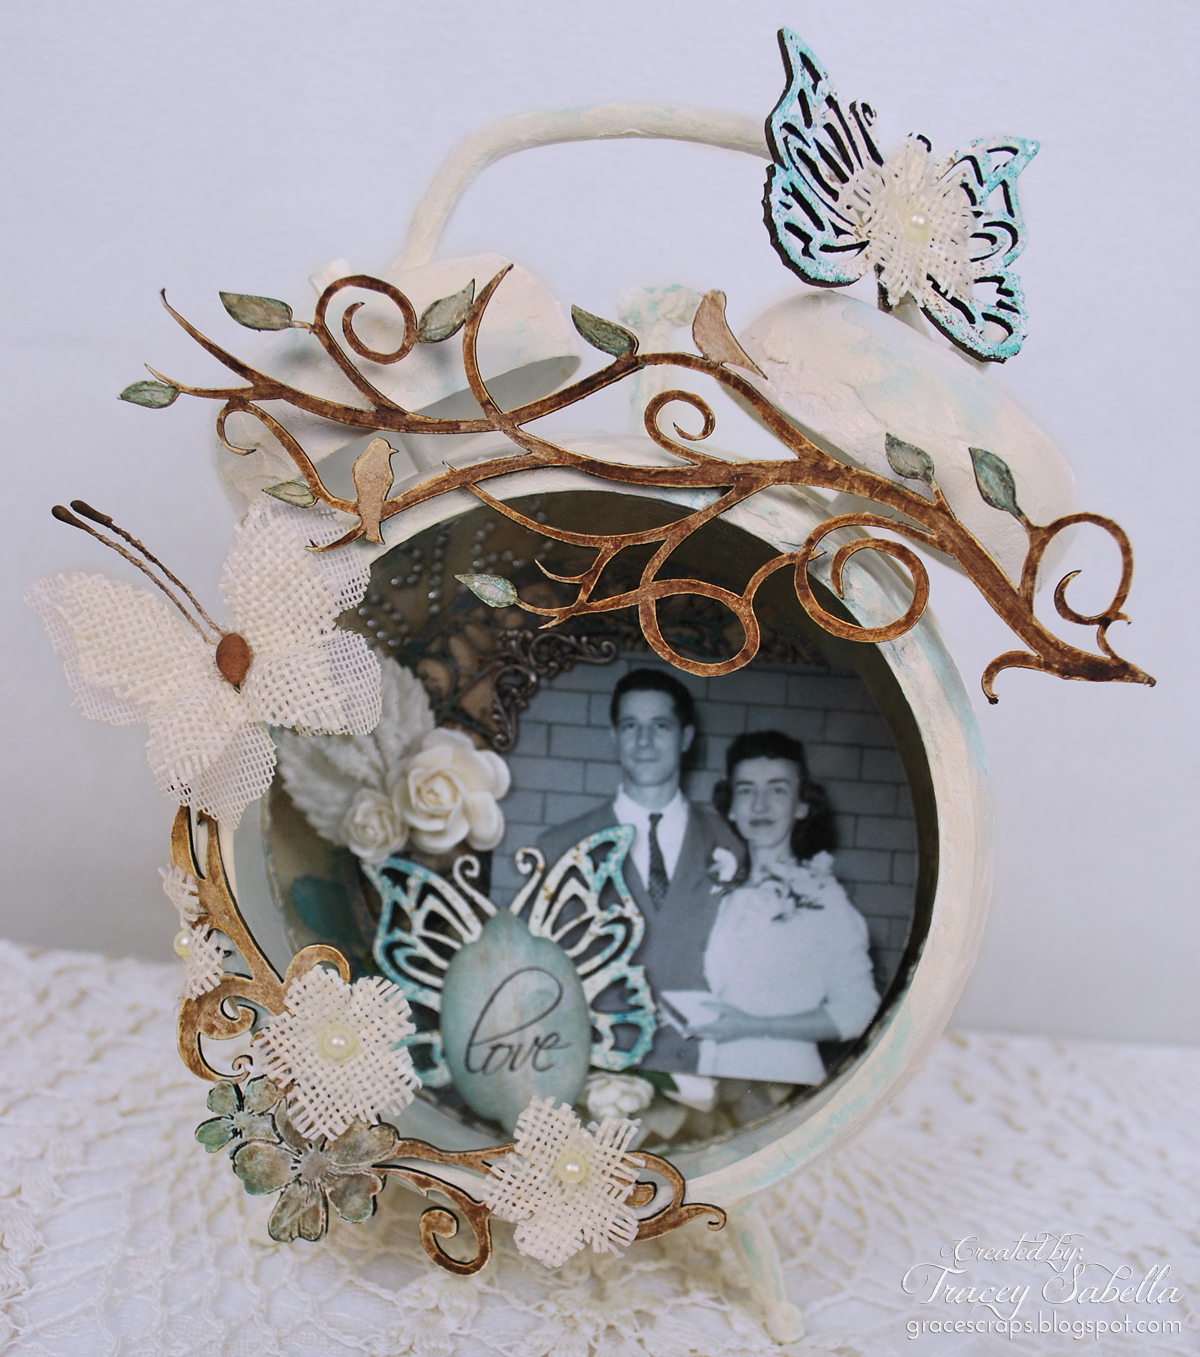
Altered Clock with Leaky Shed Studio Chipboard by Tracey Sabella

It's Tracey here to share an altered clock I created featuring gorgeous Leaky Shed Studio chipboard. This is a gift for a sweet friend who will be getting married in June. Her grandparents were an important part of her life. She wanted a special memento to display representing their presence on her wedding day. 

Tips and Techniques
Here's a photo of the inside of the clock. I adhered the photo and elements to the back panel which I had gessoed, covered with crackle paste, then colored with Lindy's Stamp Gang mists.

I've used the gorgeous Clock #2 (small) behind Mandy's grandparent's photo. I had extra teal mist in my craft mat and rubbed the clock across the splattered mist to color. When the mist was dry, I rubbed with several colors of metallic paint in teal and gold.

The Leaky Shed Spring Butterfly (small) comes with three sweet butterflies per set. I've heat embossed this one with Fran-tage Aged Ivory embossing enamel, then lightly on the edges with Iced Enamels turquoise Relique (embossing) Powder. I stamped and die cut the love sentiment layered as the butterfly body.

Don't Mandy's grandparents look so happy and in love?

I trimmed down the Leaky Shed Studio Harja Flower Eins flourish and colored it with Lindy's Stamp Gang mists. Layering once color over another results in the color variations seen on the flowers. I adhered several burlap flowers around the flourish since Mandy's using burlap in her wedding decor.

The clock was painted with several coats of gesso then using a palette knife to apply crackle past to the surfaces of the clock. Here I was looking for a peeling paint effect. I brushed with watered down mists to color.

The natural topper for this sweet clock would have been a heart flourish, however, one of Mandy's favorite childhood memories with her grandmother was counting birds, so I just had to use this charming Leaky Shed Studio Bird Branch chippboard. I've painted the piece with white gesso, then brushed on several shades of Lindy's mists to color. The butterfly is created just like the one previously described, then centered with another of the tiny burlap flowers.

Here's a side-view giving you another angle of these sweet chipboard pieces!!

Thanks for stopping by today!!
I hope you'll try Leaky Shed Studio Chipboard
on your next altered project!


Leaky Shed Studio Products
Bird Branch

Please stop by my blog Friday for a complete product list HERE.

Thursday, March 26, 2015

Mixed Media Layout with Tracey S.

It's Tracey here to share a layout featuring gorgeous Leaky Shed Studio chipboard. I like to cut things apart and use them in non-traditional ways. Here I've cut apart the swirl tree and used the flowing limbs as flourishes below and next to the photo.

I've used a photo of Dark Hedges in Northern Ireland taken by my scrapbooking friend, Linda Eggleton. As soon as I saw this image, I fell in love the the lines and colors and knew it would be a gem to create with. Linda has graciously given me permission to scrapbook a copy of it. You can find more of her delightful photos and work HERE.

"Splendid, Wonderful, Breathtaking"

Tips and Techniques
I just adore how the lines of the Swirl Tree chipboard follow the lines of the gorgeous trees in my photo. I've used two layers of Fran-tage Aged Silver embossing enamel to pick up on the colors of the limbs as well.

Here you can see the larger piece of the "tree" below my photo. I've added textures to the background with stenciled molding paste, sheet rock mesh topped with super heavy gesso, then spritzed and splattered with Lindy's Stamp Gang Mists.

Above the grungy photo slide frame, I've added a bit of a Leaky Shed Studio Bird Cage. I used the bottom part in a previous project and of course saved the top to tuck in here. It's painted with black gesso, then dry brushed lightly with white gesso. 

This Leaky Shed Studio Spring Butterfly is heat set with a couple different colors of embossing enamel. First I covered and heat set the entire piece with Fran-tage Aged Ivory Embossing Enamel, then applied just a little Perfect Medium to the wing edges and sprinkled very lightly with Aged Hunter and heat set again. I was careful not to sprinkle too much of my second color so it wouldn't be a solid block of color as I wanted the lighter color to show through. 

Isn't it sweet how this metal flourish looks like the butterfly body and flows into a lovely, flowing trail? If you are wondering how I adhere chipboard and heavy metal pieces like this to my background, I have found that Helmar 450 gives a strong bond even in difficult hard to hold situations like this.

More flowers and textures. 

One final shot.

Thanks for stopping by today. I hope you'll grab some
Leaky Shed Studio chipboard to use on your next project!


Leaky Shed Studio Products
Bird Cage
Swirl Tree Small
Spring Butterfly Small

For a complete product list, please stop my my blog, Garden of Grace.

Thursday, March 5, 2015

a peeky Easter egg--you know, like a sugar egg? with trisha too

I loved sugar eggs when I was a child--you know the kind I mean?  Made of pure sugar, with little Easter scenes inside.  They seemed magical.  

So here's my paper person type version:
Spring Butterfly Small--3 pack!

luminescent metallic paint

It rests on a wooden spool pedestal, and is full of roses.  If you'd like a quick how-to, there is more information available on my blog.

Thank you for stopping by the Leaky Shed Studio, and have a wonderful Thursday!
:)trisha


Tuesday, February 17, 2015

Floral Birthday Card by Tracey S.

Hi everyone, it's Tracey S. back to share a floral birthday card featuring two classic Leaky Shed Studio chipboard pieces. There are some shapes that never go out of style and two of my favorites are the gorgeous Spring Butterfly and Small Ring Frame.


Tips and Techniques
I heat embossed the butterfly with Fran-tage Aged Ivory Embossing enamel, the heated small sections at a time and sprinkled lightly with amethyst Iced Enamels Relique Powder, continuing to heat until melted. I repeated this until the entire image had sprinkles of purple. I centered three iridescent gems down the center to create a head and body. 

I've used the same technique to color and texturize this Ring Frame chippie. Along the bottom inside of the ring, I've adhered some lovely Prima lace that I colored with Color Bloom spray and layered mica chips. The top is filled in with microbeads, chunky glass glitter, and Shaved Ice fragments.

I've embellished with lots of flowers, buttons, pearls, and die cuts along with pearl beads and berry stems. The background is stenciled with molding paste, misted to color, and splattered with white ink.

One final side view.

Leaky Shed Studio Products


For a complete product list, please stop by my blog, Garden of Grace.

So glad you stopped by today!

~ Blessing ~