Showing posts with label Keyhole Fancy. Show all posts

Tuesday, May 5, 2015

Grungy Guy Card by Tracey S.

It's Tracey back to share my latest Leaky Shed Studio project with you. While I adore creating feminine, girlie grunge style projects, there's nothing like a grungy masculine card for the men in my life. Leaky Shed Studio has some fabulous pieces that are so perfect for guy cards. Today I'm sharing the birthday card I created for my amazing husband, Gary.

I've gone to my stash and most of the items used have been in my possession for a while. I hope you'll play along with our "Use Your Stash" Challenge. Scroll down for all the details.


Tips and Techniques
It's so easy to give a grungy metallic finish to these Leaky Shed Studio Watch Parts by heat embossing with Fran-tage Aged Black Embossing Enamel. I've mixed in some metal elements to span across the card.

I adore the way the etched lines in this intricate Key Hole stay visible when heat embossed. I combined a base of bronze enamel, then sprinkled lightly with super fine black and reheated.

I used the same technique for the Key and alcohol ink on the metal sentiment.

Here's a view to see both the key and keyhole. I've also added a pair of Leaky Shed clock hands below the sentiment, enameled the same as the Watch Parts. The background is painted with transparent crackle, dry brushed with white gesso, then spritzed with mist to accent the cracks. 

Thanks so much for stopping by today!
I hope you'll grab some Leaky Shed Studio chipboard and join our "Use Your Stash" Challenge.

Here is the challenge to you!
We at LSS want you to create a project using stuff from your stash and some Leaky Shed Studios chipboard and Leaky Shed Studio will send out a prize!  

To play just post a link to your blog post of your project using your stash and Leaky Shed Studio chipboard in the comments section before May 21st and we will draw a winner ...

AND if you want to earn an extra entry - share your project on our Facebook page!
The winner will be announced on the Leaky Shed Studio Facebook Page and the winner has 14 days to claim their prize! 


LSS Products

Please stop by my blog Wednesday for a complete product list HERE.
~ Blessings ~

Monday, January 5, 2015

Blessings Box by Tracey Sabella

Hi everyone. It's Tracey here to share my first project of 2015.

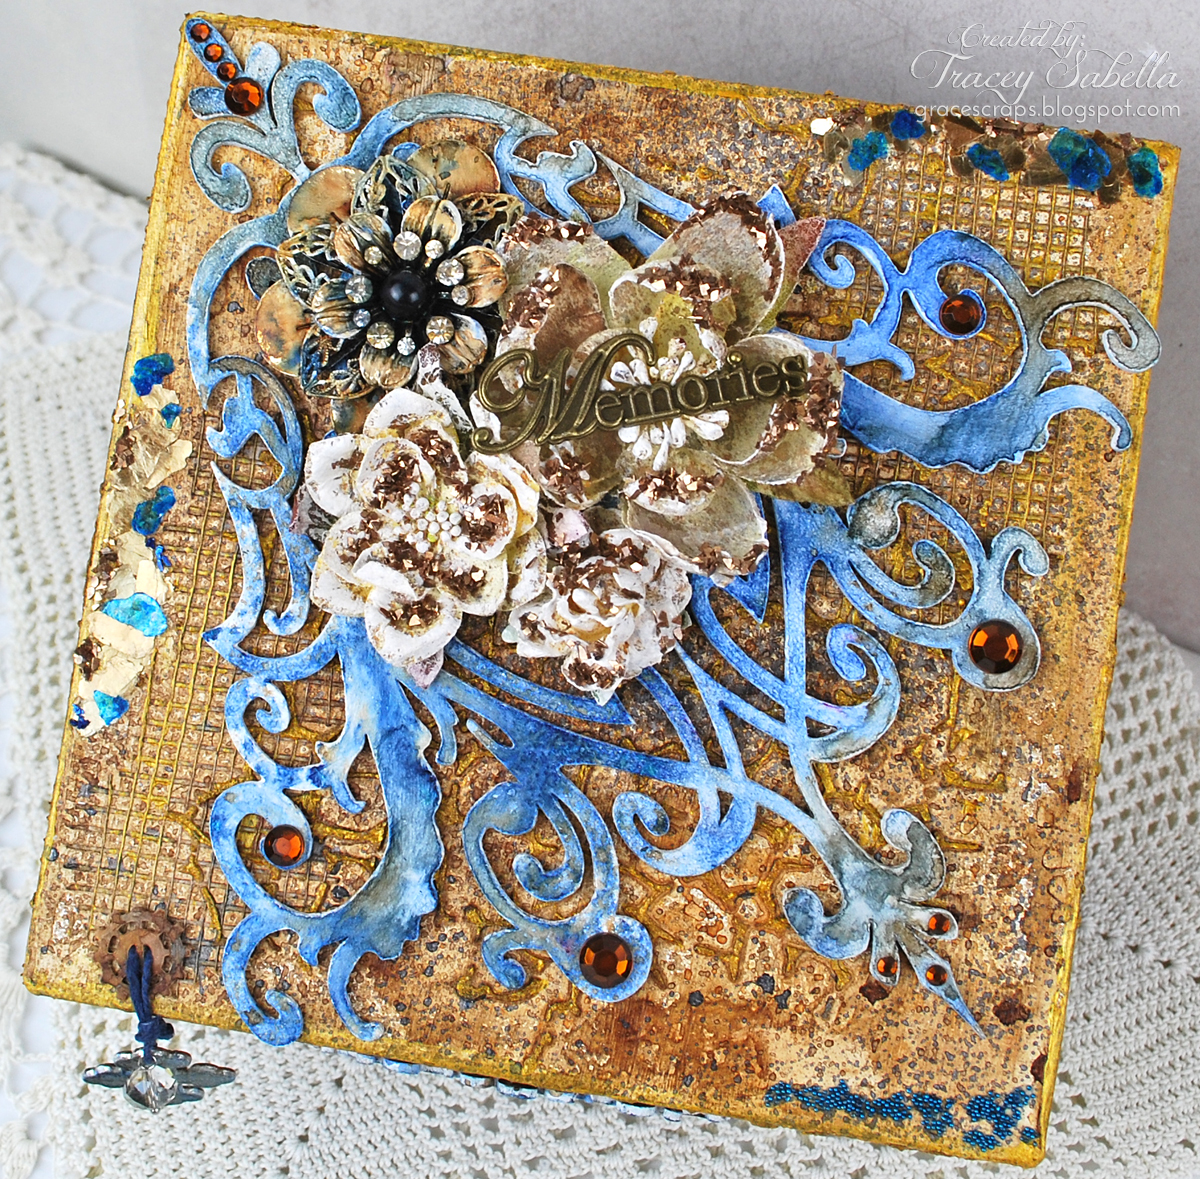
I have so many blessings day by day. However, as the year goes by, it's all to easy to overlook them, especially when those challenging days happen. I've created this Blessings Box, so I can write down those sweet blessings and collect them in my box. I've featured the gorgeous Leaky Shed Studio Moroccan BorderOrnate Banner, and Fancy Keyhole.

Blessings Box

Tips and Techniques
The base of my Blessings Box is a 6" square paper mache box. I painted the box and all chipboard pieces with two coats of white gesso. This Ornate Banner was misted with two colors of Lindy's Stamp Gang mist, then decorated with rhinestones. 

I've edged the box with a mix of mica flakes, German glass glitter and microbeads.

The dangling cross is attached by looping cording through the cross and bead then knotted. The cording was then pulled through a gear, then through two holes in the box lid and knotted on the other side.

The box base was layered with strips of sheetrock mesh and stenciled molding paste. I spritzed the textured surface with several colors of Lindy's Stamp Gang mist - allowing to dry between colors. The raised areas and box edges are rubbed with Viva Gold Modeling Cream.

The metal flower was painted with white gesso, except for the rhinestones and dark center. Then when dry, I spritzed with several colors of mist. 

The remaining flowers were misted in the same colors as the box base, then brushed with gesso. I dabbed them with Glossy Accents to adhere chunky glass glitter.

Front view - I cut each of the Moroccan Borders into two pieces, cutting and sanding the cut ends to look like the laser cut ends. I repeated the border on all four sides. The Fancy Keyhole and border are colored the same as the Ornate Banner on the top of the lid.

The cross is a metal charm I painted with gesso and misted.

Here you can see more of the texture and how I added chunky glass glitter around the Moroccan Border

Leaky Shed Studio Products

A full product list can be found on my blog,

Thanks for stopping by today!

~ Blessings ~

Thursday, September 25, 2014

"Merry & Bright" Christmas Card by Our September Guest Designer, Gloria Stengel

Hello, it is Gloria Stengel (Scraps of Life) with you today. This is my second project as the September guest designer at Leaky Shed Studio! I have loved playing with the amazing chipboard items!

I have created a Christmas card for you! I know, for some of you, it is way too early to think about Christmas cards! But, it is never to early to compile ideas!

"Merry & Bright"
I created a 4 1/2 x 6 inch card, using lots of layers, chipboard items, and flowers. This is a lumpy one, and will require extra postage and a padded envelope. You could also use this idea to create a home decor item!


I stared out by painting a selection of Leaky Shed Studio chipboard items with a coat of white gesso. Once the items were dry, I sprayed them with Tattered Angels Chalk Chalkboard Mist.

The large chipboard circle is actually the center piece from the Clock #1 chipboard item! (Never throw anything away!) I sprayed the chipboard with Tattered Angels Kiwi Glimmer Mist and then dried it with my heat tool. It gives a marbled look to the chipboard. I created a white, top-fold card from 4 1/2 x 12-inch cardstock, scored at 6 inches. I trimmed the red paper to 4 7/8 x 5 7/8 inches and distressed the edges before adding it to the card. I trimmed the plaid paper to 4 3/4 x 5 3/4-inches, distressed the edges and added it to the red panel. (The printed paper is from the Graphic 45 'Twas the Night Before Christmas collection.) I used Scor-tape to attach the cheesecloth to the center of the card. I glued the chipboard circle to the card, and then added the twine with Scor-tape.

I trimmed out the main image from the designer paper, and matted it with red paper. I attached the image to the card with foam squares.


I used the Keyhole Fancy as the base to build my flower cluster. I used a clock image cut from the designer paper, and then added flowers. To mimic snow, I added a bit of white gesso to the red flowers.


I glued the Flower Corner Small  to the left corner of the card and added the postage image to the top.

I tucked several Watch Parts around the edges of the image. Once the card was all put together, I used a pint brush to splatter it with Tattered Angels Creme de Cocoa and Crimson Glimmer Mist. Unfortunately, too many splatters ended up on the little boy's face! I saved the card by using a circle punch to trim out a second image. Then, I layered the circle over the main image with foam squares.

I hope you enjoyed my shabby Christmas card! Thanks for reading! I enjoyed my guest spot very much!

Guest Designer - Gloria Stengel

Leaky Shed Studio products:


Other products: Cardstock: WorldWin ColorMates Textures Cascata White Designer paper: Graphic 45 'Twas the Night Before Christmas (12x12, 8x8, 6x6 pads) Twine: Really Reasonable Ribbon Cheesecloth: fabric store Gesso: Liquitex White Spray mists: Tattered Angles Chalkboard Chalk, Glimmer Mist Kiwi, Creme de Cocoa, Crimson Flowers: Wild Orchid Crafts Circle punches: Stampin' Up! Decorative scissors: Provo Craft Adhesive: Scotch 3M ATG tape; Aleene's Tacky Glue; Scrapbook Adhesives by 3L 3D Foam Squares; Scor-tape

Be sure to stop by Gloria's blog, Scraps of Life, to see more of her inspiring work!