Thursday, April 30, 2015

Welcome to LSS "Challenge"


Hi Veronica here today to welcome you to our LSS challenge "Use Your Stash".  I personally love using my stash.

Here is the challenge to you!
We at LSS want you to create a project using stuff from your stash and some Leaky Shed Studios chipboard and Leaky Shed Studio will send out a prize!  

To play just post a link to your blog post of your project using your stash and Leaky Shed Studio chipboard in the comments section before May 21st and we will draw a winner ...

AND if you want to earn an extra entry - share your project on our facebook page!
The winner will be announced on the Leaky Shed Studio Facebook Page and the winner has 14 days to claim their prize! 

For my post today I decided to use an old wire basket that I was going to throw out.  Instead I re-purposed it and used some pieces of left over paper, a roll of jute string, my glue and of course my Leaky Shed Studio chipboard.


I started by preparing my chipboard with Tim Holtz Distress Inks ...


I then used a little "wow" embossing powder in copper to give my chipboard a metal industrial look.


I added the bracket background and was finished with my frame


I have lots of jars of different crystals, metal pieces, and pretty jewels.  So instead of having all my jars spread around ... I decided to put them all in one place.


Thank you so much for stopping by our challenge today.  Remember if you want to play leave a comment below with a link to your project using your stash and Leaky Shed Studio

For more photos of my project above - stop by my blog :)

Thank you,
Veronica at Kitsnbitscraps


Tuesday, April 28, 2015

she had a lot on her mind . . .

An old book cover for a canvas, lots of paint, and of course plenty of Leaky Shed Studio chip:

flowers and beads and gears


You'll find the Steampunk Cameo HERE,  and the Six Piece Gear Set HERE.  The lovely and talented Laura has issued a challenge with fun prize, so be sure to check out the details at THIS POST.

Thank you for stopping by!  If you'd like to know more about this altered book cover, there are more details on my blog post HERE.
:)trisha

Tuesday, April 21, 2015

A challenge and a prize!

Good morning everyone, Laura here!

I hope you are all enjoying your Tuesday....it's supposed to rain here all day so it will be a good day to scrap!

I decided it was time to go through my stash and use some of it up....so I found these papers
from Glitz designs that I really love that had been sitting for a while...some flowers I had and doilies.
Then I added some new Leaky Shed Studios chipboard!

'Time Spent With Family'

 
I love this photo of my family


 I cut the Large Medallion into two pieces!  perfect for the corners!


I also used the Moroccan Border!
To alter the Leaky Shed Chipboard I sprayed with Dylusions postbox red and black marble sprays then added a little bit of ranger distress stickles!


I also altered my flowers because although I was challenging myself to use some of my stash and they were from my stash and the perfect size - the color did not match!

So here is my challenge to you!
I want you to create a project using stuff from your stash and some Leaky Shed Studios chipboard and Leaky Shed Studio will send out a prize!  
Just post a link to your blog post of your project using your stash stuff and leaky shed chipboard in the comments section before May 21st and I will draw a winner
AND if you want to earn an extra entry - share your project on our facebook page!!!
The winner will be announced on the Leaky Shed Studio Facebook Page and the winner has 14 days to claim their prize! 

Leaky Shed products used
Moroccan Border
Large Medallion

Thanks for stopping by!

Saturday, April 18, 2015

a cup of tea to go . . .

Do you drink tea?  Lots of tea?

Me, too!

Here's a tea caddy I created for my portable stash, using the adorable Leaky Shed teapot:

What a great shape, right?
I pretty much use that awesome crackle on everything, but you have to admit, it's perfect for a teapot glaze!


Lots of deep pockets inside for my portable stash.
Thank you for stopping by the Leaky Shed Studio today.  If you're interested, there are a few more details about this tea caddy on my blogHave a wonderful Saturday!

:)trisha

Thursday, April 16, 2015

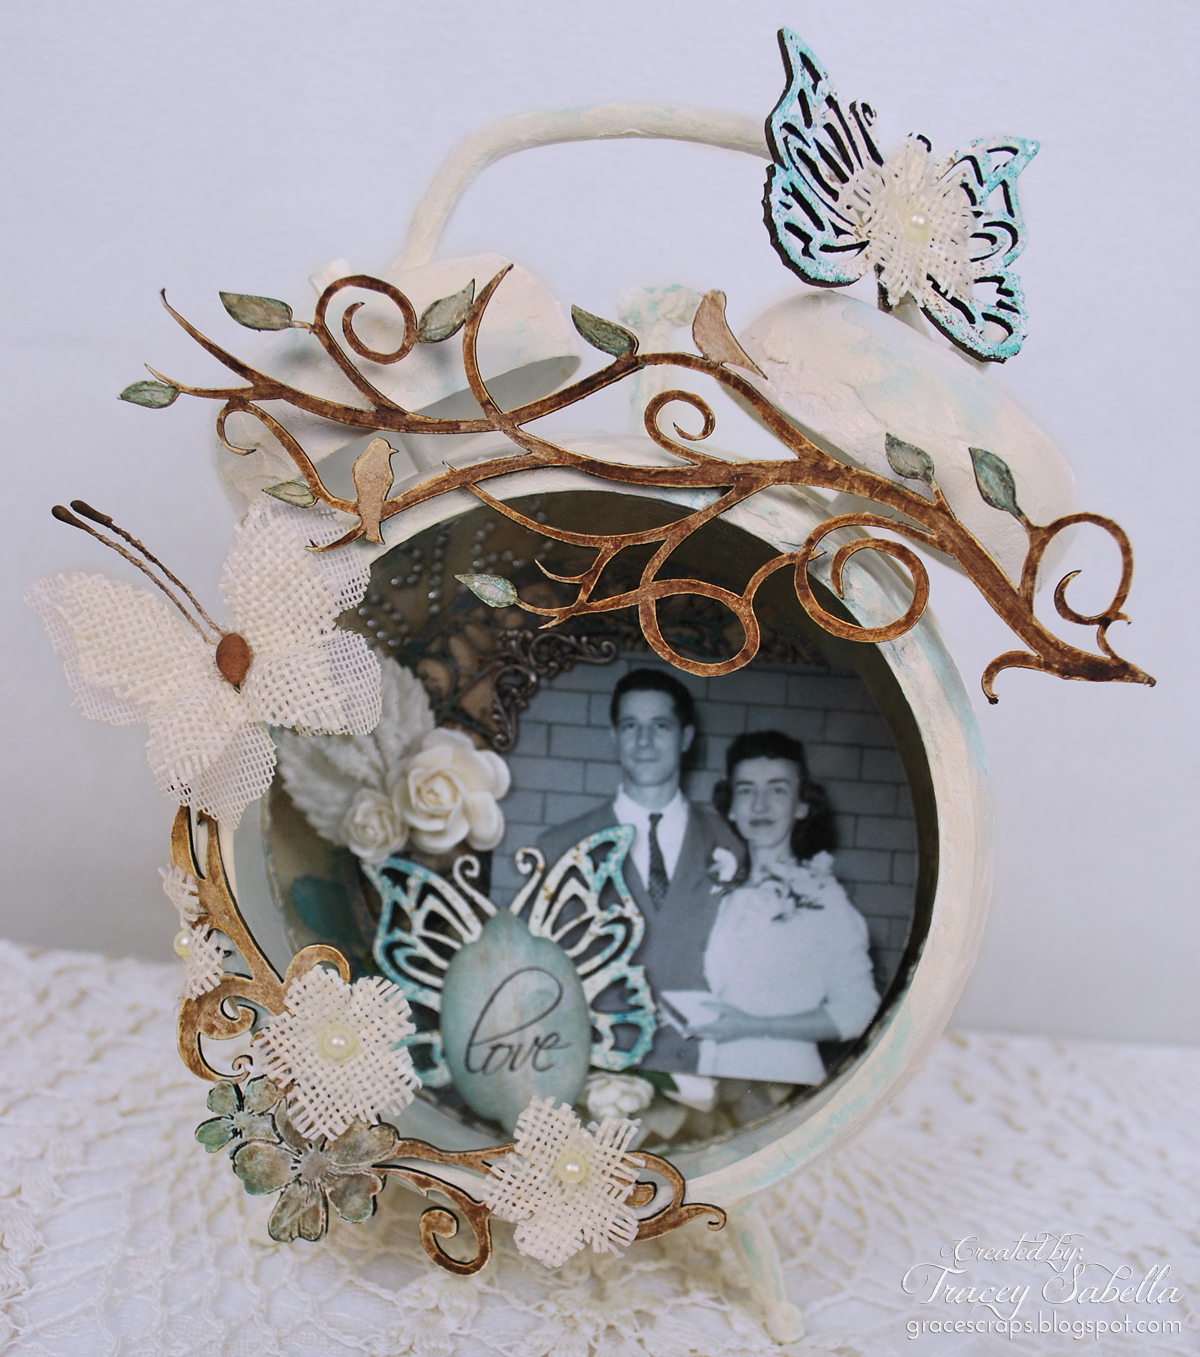
Altered Clock with Leaky Shed Studio Chipboard by Tracey Sabella

It's Tracey here to share an altered clock I created featuring gorgeous Leaky Shed Studio chipboard. This is a gift for a sweet friend who will be getting married in June. Her grandparents were an important part of her life. She wanted a special memento to display representing their presence on her wedding day. 


Tips and Techniques
Here's a photo of the inside of the clock. I adhered the photo and elements to the back panel which I had gessoed, covered with crackle paste, then colored with Lindy's Stamp Gang mists.

I've used the gorgeous Clock #2 (small) behind Mandy's grandparent's photo. I had extra teal mist in my craft mat and rubbed the clock across the splattered mist to color. When the mist was dry, I rubbed with several colors of metallic paint in teal and gold.

The Leaky Shed Spring Butterfly (small) comes with three sweet butterflies per set. I've heat embossed this one with Fran-tage Aged Ivory embossing enamel, then lightly on the edges with Iced Enamels turquoise Relique (embossing) Powder. I stamped and die cut the love sentiment layered as the butterfly body.

Don't Mandy's grandparents look so happy and in love?

I trimmed down the Leaky Shed Studio Harja Flower Eins flourish and colored it with Lindy's Stamp Gang mists. Layering once color over another results in the color variations seen on the flowers. I adhered several burlap flowers around the flourish since Mandy's using burlap in her wedding decor.

The clock was painted with several coats of gesso then using a palette knife to apply crackle past to the surfaces of the clock. Here I was looking for a peeling paint effect. I brushed with watered down mists to color.

The natural topper for this sweet clock would have been a heart flourish, however, one of Mandy's favorite childhood memories with her grandmother was counting birds, so I just had to use this charming Leaky Shed Studio Bird Branch chippboard. I've painted the piece with white gesso, then brushed on several shades of Lindy's mists to color. The butterfly is created just like the one previously described, then centered with another of the tiny burlap flowers.

Here's a side-view giving you another angle of these sweet chipboard pieces!!

Thanks for stopping by today!!
I hope you'll try Leaky Shed Studio Chipboard
on your next altered project!


Leaky Shed Studio Products
Bird Branch

Please stop by my blog Friday for a complete product list HERE.

Thursday, April 9, 2015

Scatter Joy Card with Veronica Johnson (kitsnbitscraps)


Hi, Veronica here today to share with you a sweet card.  This card is blank inside but the sentiment on the front "Scatter Joy" can be for a friend/family member that you are thinking of.  It can also be used as a Birthday card.

My card is 5x7 which is my favorite card size.  I have plenty of room to add lots of layers and Leaky Shed Chipboard.

Today I used the Leaky Shed Studio -  Bird Branch


I used the Outline stamps to create a stacked flower.


For my Leaky Shed Studio Bird Branch I used some paints, copics and embossing powder


For my process and the product list that I used other than Leaky Shed Studio chipboard, please click here for my blog:  Kitsnbitscraps


Thank you so much for stopping by today ...

Veronica Johnson (kitsnbitscraps)


Leaky Shed Studio Product Used:

Thursday, April 2, 2015

Easter Card with Enameled Chipboard by Tracey Sabella

It's Tracey S. here. I'd like to wish you a wonderful and blessed Easter. With this sacred holiday approaching, I've created a card to celebrate featuring the Leaky Shed Studio Cross Set, Flower Corner Small, and to frame my sentiment inside - the medium Victorian Oval Frame.

"Rejoice"

Tips and Techniques
I kept my chipboard treatment simple by heat embossing all of the chipboard images with Fran-tage Shabby White Embossing Enamel. I adore how this product has flecks of gold enamel along with shimmering glitter giving a light but grungy effect. The Small Flower Corner nests around this image just perfectly.

I stamped the sweet lamb image onto white cardstock, lightly shaded with Pan Pastels, and colored the straw with Caran D'ache NeocolorII watersoluble pastels.

Sweet flowers dry brushed with gesso are tucked in and around the chipboard corner. I've surrounded the flowers with color fragments.

Another view of the flowers and you can see better here how they nest right into the Leaky Shed Studio Small Flower Corner.

A close up of the right cluster.

Of course, I had to include one of the Leaky Shed Studio Crosses, which perfectly accents my sentiment.

Here's another view. I stamped the image, inked around the edges, then popped it up with lace and tiny rose buds tucked in.

This final shot shows how I've used the medium size Victorian Oval Frame around my sentiment. This gorgeous frame set also includes a larger and smaller frame.

Thanks for stopping by today!
I hope you've been inspired to grab some
Leaky Shed Studio Chipboard to create a holiday card.


Leaky Shed Studio Products

For a complete product list, please stop my my blog, Garden of Grace.