Showing posts with label Card. Show all posts

Thursday, April 9, 2015

Scatter Joy Card with Veronica Johnson (kitsnbitscraps)


Hi, Veronica here today to share with you a sweet card.  This card is blank inside but the sentiment on the front "Scatter Joy" can be for a friend/family member that you are thinking of.  It can also be used as a Birthday card.

My card is 5x7 which is my favorite card size.  I have plenty of room to add lots of layers and Leaky Shed Chipboard.

Today I used the Leaky Shed Studio -  Bird Branch


I used the Outline stamps to create a stacked flower.


For my Leaky Shed Studio Bird Branch I used some paints, copics and embossing powder


For my process and the product list that I used other than Leaky Shed Studio chipboard, please click here for my blog:  Kitsnbitscraps


Thank you so much for stopping by today ...

Veronica Johnson (kitsnbitscraps)


Leaky Shed Studio Product Used:

Sunday, March 1, 2015

Cameo Card With Veronica


Hi Veronica here today to share with you a pretty vintage card using Leaky Shed Studio Cameo chippie.

I used both the Cameo and the Damask chipboards.  Then I added all my favorite "go to" embellishments, ribbon and flowers and jewels.  I also added different mist sprays, copics and also gold paint.


After adding the micro beads I went ahead and sealed it with Helmar Crystal Kote Matte Varnish so that the beads stay put.  Then I splattered my entire card with gold paint.


Thank you for stopping by today .... happy scrapping

Veronica Johnson (kitsnbitscraps)


Leaky Shed Studio Product Used:


Wednesday, August 6, 2014

Card using the Cross Set

Hi Leaky Shed Fans!  Christine joining you today to share a card that could be used for encouragment, get well, or just as a general note.  My hubby is a Pastor so I am always on the lookout for some good Christian pieces to use on my paper crafts!  Today I have used the fabulous cross set from Leaky Shed Studio!
I created a base for my card using patterned papers and cardstock.  I then added some glitter tape and a pretty frame.  All those draw your eye in to the focal point of my crosses.  Centering the big one and adding a sequin to it make it really pop out!

I left my chipboard pieces in the raw instead of coloring them - they just worked right as crosses for me that way!  I added a simple 3 D sentiment sticker and it is done - ready to send off to a friend who needs it!  Have you made anything with these crosses or something similar from Leaky Shed?  We'd love to have you share it with us on our facebook page!


Thursday, June 26, 2014

"You Make My Heart Sing"

I'm a music teacher so when I saw the musical staff border I was very excited!  I debated using it on a layout but decided I really wanted to make a card with it!

One measure was a perfect fit for an A2 card!  So after using my black mist to color it, I cut it off there and added it to the top of the card.  I followed the curve of it to line the bottom with patterned paper.

I then topped the whole thing with heart embellishments and stickers to go with the color scheme.  It comes together to make a perfect card for celebrating someone be it their birthday, congratulations, or just encouraging them along!

Thanks for stopping in today!


Tuesday, May 6, 2014

Whimsical Spring Kite Cards

 Christine joining you for my very first post today!  

As soon as I saw the kites, I fell in love!  They are so fun and whimsical and I knew I wanted to do my first project with them!  Today I have two different cards to share with you!
For this one I just used the outline piece and backed it with patterned paper.  Combining it with other spring elements makes for a fun whimsical card perfect for sharing with a friend!

I used acryclic white paint to color my kites.

For this card I went more clean and simple.  I back each quadrant of the kite with a different patterned paper and then also did the same on the card making sure they didn't match up.  It's a quick technique that allows you to share some patterned paper that you love but keeps the focus on the awesome kite!

I went a little less heavy on the paint on this one allowing the chipboard to show thru a bit - it gives a little bit of the worn wood feel that a kite might have.

Thanks for joining us today!  We'd love to see what you've been creating with Leaky Shed Studio products!


Leaky Shed Studio Products

Thursday, April 24, 2014

Music Box Card with Leaky Shed Studio Swirl


Hi, Veronica here today to share with you a lovely Pop Up Box Card.  Apparently these beautiful and crafty cards have been around, but I never knew about them!  I guess because I tend to do albums I don't really look at cards though I do make cards occasionally. 

I was hanging out with my girlfriend, she and I always do a weekly crop and show & tell.  Anyway she brought over a beautiful steam punk-ish pop up card she made and I thought it was awesome.  She found the tutorial on Split Coast Stampers. Click the link and Dina will walk you through.  You should try one, they are so fun and easy to make.

Well instead of using a lot of stamped images I decided to use the Leaky Shed Studio awesome laser cut chipboard. 


I had some musical notes chipboard on hand and thought it would be great to use them as a birthday themed card.  Can't you just hear it!  Happy Birthday To You ... Happy Birthday To You.  This card can be for both male and female.


I decided to add a beautiful Swirl Vine which I cut into pieces and then I embossed them in Silver embossing powder.


Doesn't it look like confetti popping out of the card.  I also wanted of course to use my musical notes which is where I got my inspiration from.


I used a slightly different technique on my Musical Notes because I wanted them to look more like real metal.  My steps were:
 
1.  Paint the LSS chipboard black with acrylic paint
2.  Emboss with silver embossing powder
3.  Emboss with clear embossing powder

By embossing the Leaky Shed Studio chipboard a third time the paint from the bottom starts to bubble to the surface and that is where you get the flecks of black showing through.


I hope you enjoyed my Pop Up Box Card today, I will definitely be making more of these.  Thank you for stopping by and letting me share with you.


Happy Scrapping ... Veronica (kitsnbitscraps)

Leaky Shed Studio Product Used:
Music Border (new item in stores soon)
Musical Notes (518)
Swirl Vine (715-1)


Wednesday, February 5, 2014

Modern Double Hearts Valentine's Card

Happy early Valentine's Day everyone! I don't know about you, but I love to tell the one I love just how much they mean to me. With Valentine's Day coming soon, I thought it would be nice to make my husband a special card using the Modern Double Hearts chipboard piece from Leaky Shed Studio.


To dress up the chipboard, I heat embossed it with gold embossing powder. Then, I adhered it to a piece of patterned paper and trimmed around it. Before I attached it to the front of my card, I adhered it to a piece of black cardstock and trimmed around it leaving a small border.


This was not the only Valentine's Day Card that I made using Leaky Shed Studio chipboard. If you're interested in seeing another card that I created, please visit my blog 17turtles. (Click on the word 17turtles.)

Leaky Shed Studio Chipboard:

Monday, February 3, 2014

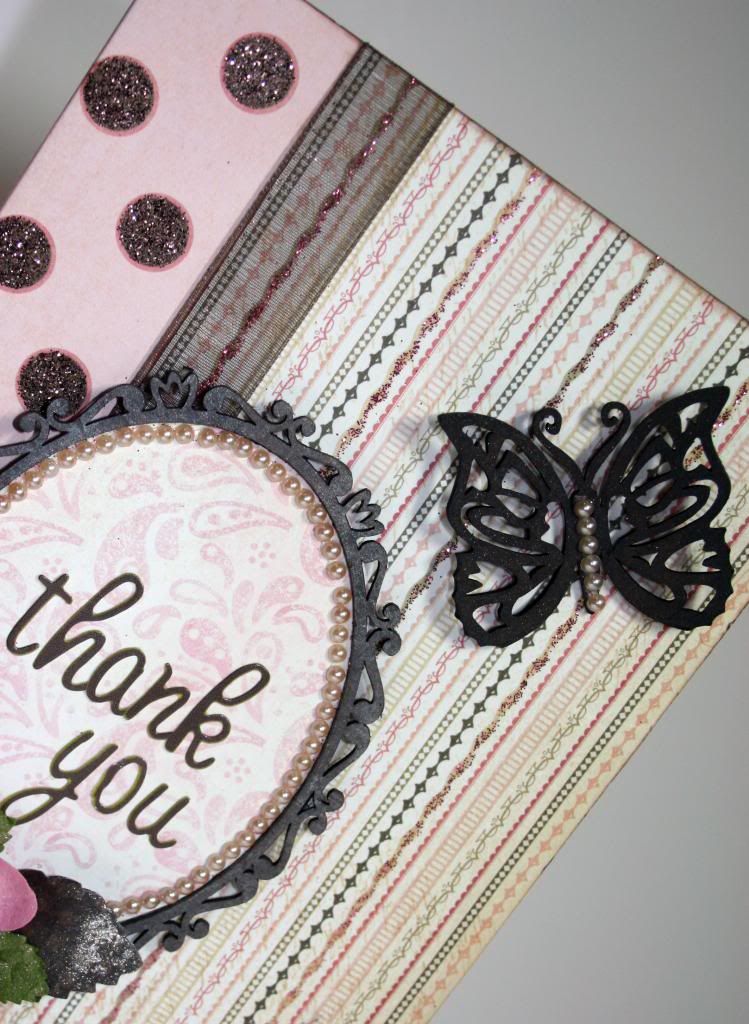
Thank You Card

Hi everyone!  It's Robbie today and I wanted to share a quick Thank You card that I made for a friend.  This was not what I was planning to share today, but my daughter asked me to visit her so I fell behind on getting everything done.  

I actually made this card and am sending it off tomorrow, so I took a photo for today's post.  In case you ever wonder if I actually do love these products, now you know!  I use the chipboard even when it isn't for an assignment.  I could use the Victorian Oval Frames constantly!


I kept the chipboard coloring pretty simple.  I first inked with black chalk ink, layered chestnut over it and gave it a light mist of Glimmer Mist to shine it up a bit.  After it was dry, I added paper to then inside of the frame to match the inside of the card and finished everything off with some sticky pearls.
 

The flower cluster was done with some flowers, punched leaves and ribbon.  Before I attached the flowers and leaves to the cluster, I gave them all a light mist of Glimmer Mist.


Thanks so much for stopping by to see my project!

Supplies Used:  
Victorian Oval Frames
Spring Butterflies Small

Be sure to stop by our Facebook page too!  Share your projects, we love seeing what you are creating with Leaky Shed Studio products!

Friday, January 17, 2014

Birthday Card Featuring Painted Chipbard

Hi, it's Tracey, back to share a card I've created featuring gorgeous Leaky Shed Studio chipboard.

Birthdays are special days to celebrate, and I enjoy creating handcrafted cards for my family for their special days.

Birthday Wishes

Tips and Techniques
I took the one of the small butterflies and soaked it in warm water until it was soft and wet through. Then I pulled each of the wings apart into three layers, leaving the body and antennae intact. I curled up and shaped the layers with my fingers and heat set. I painted with gold metallic paint, then dry brushed with metallic blue paint. 

The Blowing Leaves Frame was painted using a fine tip paintbrush. One of the things I like to do is to swirl two or three similar colors of paint together, but not mix thoroughly. Then, when I paint, I get variations in the colors.

Here's another angle of the butterfly corner.

I stamped the sentiment onto a flag shape I had cut and inked, then added a resin piece and flower to the base.

I cut a Flower Corner into two pieces to layer under the sentiment. I treated it with a quick coat of metallic paint.

I've used another chipboard piece to frame my sentiment inside the card, the medium Victorian Oval Frame. I folded and tucked a piece of ombre organza ribbon on each side. I've painted this frame with more of the gold metallic paint. 

Here's the card at another angle. Behind the sentiment, I have misted then over the mist, stenciled a crackle design. Each of the layers is inked and distressed. To add more texture, I glued a piece of cream mesh ribbon to the back of my sentiment piece, then unraveled it so the fibers would flow across the end of the card,

Leaky Shed Studio Products
Blowing Leaves Frame
Spring Butterfly Small (Set of 3)
Flower Corner
Victorian Oval Frame (Set of 3 - medium frame used)

A full listing of products used will be available
on my blog, Garden of Grace, on Saturday.

I hope you've been inspired to grab some Leaky Shed chipboard and created a card for a special person in your life!

~ Blessings ~