Showing posts with label Victorian Oval Frame. Show all posts

Thursday, April 2, 2015

Easter Card with Enameled Chipboard by Tracey Sabella

It's Tracey S. here. I'd like to wish you a wonderful and blessed Easter. With this sacred holiday approaching, I've created a card to celebrate featuring the Leaky Shed Studio Cross Set, Flower Corner Small, and to frame my sentiment inside - the medium Victorian Oval Frame.

"Rejoice"

Tips and Techniques
I kept my chipboard treatment simple by heat embossing all of the chipboard images with Fran-tage Shabby White Embossing Enamel. I adore how this product has flecks of gold enamel along with shimmering glitter giving a light but grungy effect. The Small Flower Corner nests around this image just perfectly.

I stamped the sweet lamb image onto white cardstock, lightly shaded with Pan Pastels, and colored the straw with Caran D'ache NeocolorII watersoluble pastels.

Sweet flowers dry brushed with gesso are tucked in and around the chipboard corner. I've surrounded the flowers with color fragments.

Another view of the flowers and you can see better here how they nest right into the Leaky Shed Studio Small Flower Corner.

A close up of the right cluster.

Of course, I had to include one of the Leaky Shed Studio Crosses, which perfectly accents my sentiment.

Here's another view. I stamped the image, inked around the edges, then popped it up with lace and tiny rose buds tucked in.

This final shot shows how I've used the medium size Victorian Oval Frame around my sentiment. This gorgeous frame set also includes a larger and smaller frame.

Thanks for stopping by today!
I hope you've been inspired to grab some
Leaky Shed Studio Chipboard to create a holiday card.


Leaky Shed Studio Products

For a complete product list, please stop my my blog, Garden of Grace.

Monday, February 2, 2015

Two-tone Enameled Chipboard with Tracey Sabella

Although it is sad to lose a family pet, we have many happy memories of our Australian Shepherd, Bounder. He was 13 1/2 years old and our daughter, Elizabeth's, dog. She had many fun times with him at 4-H and UKC obedience shows. They were one of the top ranked junior obedience teams for several years. When Elizabeth moved out, Bounder remained with us and he was quite a buddy to us, especially for my husband who took him on walks every day. Bounder loved to accompany us on any outdoor work we did around the house. 

I've created a layout to remember our buddy featuring the Leaky Shed Studio Harja Flourish Zwei and Victorian Oval Frame.

"Bounder"

Tips and Techniques
The Leaky Shed Studio Harja Flourish Zwei fit perfectly to accent Bounder's name and my page title. I flipped the chipboard over for this orientation and since I planned to heat emboss, I was okay with not having the engraved design. To color, I covered and heat embossed with Jasmine Mix'd Media Inx Embossing powder. I then reheated areas and sprinkled lightly with Aged Taupe Fran-tage embossing enamel and continued to heat until it melted and repeated until the entire piece had sprinklings of the taupe color.

Here you can see a snippet of the Leaky Shed Studio Victorian Oval Frame, I used the same technique to color as I did for the flourish. 

I've embellished with mist dyed flowers sprinkled with chunky glass glitter.

I created a "dog collar" with a Tim Holtz Buckle and leather textured fabric.

Loops of thread are added in for texture. I wired pearl and crystal beads to tuck into the flower clusters.

I did a bit of fussy cutting from Prima paper to get these lovely and appropriate sentiments.

More of the Leaky Shed Studio Victorian Oval Frame and Prima sentiments. You know I love texture!! Here I've used a Prima Stencil with crackle medium as a base, then spritzed and splattered with Color Bloom mist and more splatter with drawing ink. Then I topped it all with microbeads, glass glitter, and mica flakes. 

For more details on how I drew inspiration from the January Prima Build-A-Page and Scrap Around The World Mood Board, please stop by my blog, Garden of Grace, HERE.

Leaky Shed Studio Products


So glad you stopped by today!!

~ Blessings ~

Saturday, November 15, 2014

Autumn Mixed Media Card by Tracey Sabella

Hi everyone. It's Tracey here to share a card I've created featuring one of Leaky Shed Studio's gorgeous new release chipboard pieces, the Autumn Leaf Crown along with a classic Victorian Oval Frame.

One of our daughter-in-law's, favorite colors is purple, which pairs beautifully with autumn oranges, golds, and yellows.


Tips and Techniques
To paint the Autumn Leaf Crown, I watered down some gold metallic paint and brushed it across the bare chipboard. I wanted just a gold shimmer, rather than a heavy metallic look. Once dry, I brushed orange Twinkling H20's randomly across the leaves, and heat set. These paints are no longer available in stores, but you could also mix up any watercolor paint and mix with mica for shimmer or even brush on a sparkling mist.

The Victorian Oval Frame is painted black, then lightly brushed with gold metallic paint. 

The mixed media background was applied to a piece of white mixed media paper brushed with clear gesso. I've stamped and misted using stencils to create the color and design. I randomly applied gel medium and sprinkled with microbeads and chunky glass glitter. 

The rose is edged with Prima's new Art Sugar super fine glitter, and I misted the natural dried phalaris grass to color it a golden yellow.

One final shot. You can really see here how the colors vary on the chipboard giving the feel of autumn leaves.


Autumn Leaf Crown (New Release)

A full product list can be found on my blog,

Thanks for stopping by today!

~ Blessings ~

Friday, February 7, 2014

"CREATE" a banner with our chippies.

Maggi here today to share a really fun banner project with you.  I used Graphic 45 papers to make my banner and a number of our Leaky Shed Chippies.  Below I have shared the process for preparing the letters.
  Here's the whole banner.

The banners are Leaky Shed chipboard pieces and are nicely sized at 6.4" x 8" as are the letters which are 4" tall.


I love altering my letters and this is one of my favorite methods for giving them a vintage and worn appearance.  The steps for making the letters are as follows:
1.  Paint the letters with acrylic paint in vintage white and allow to dry.
2.  Ink around the edges of the letters with Frayed Burlap Distress ink.
3.  Stamp the letters with a patterned or script stamp using Archival ink in coffee.      Be sure to use Archival ink so that it doesn't smear in the next step.
4.  Apply a thick coat of Ranger Crackle Accents and allow to dry naturally, i.e. do not use a heat gun to speed the process.
5.  Rub Frayed Burlap Distress ink into the cracks.
6. Take a lightly moistened paper towel and lightly wipe the ink off the letters leaving ink in the cracks but not on the surface of the letter.

The word inspire is one of our chippies that I have covered with Stampendous Aged Embossing Enamel in aged spice.

Up in the corner is our butterfly that I've simply painted with Splash of Color Silks in Emperor's Gold.


I added a Julie Nuttig doll to this banner.  I painted her body with iridescent water colors and cut her dress from a French Country paper scrap.  I really love these chipboard dolls, they are so fun and work with so many different projects:  cards, tags, layouts and even banners!


On this banner I've used one of our oval frames behind the letter T.  The frame has been heat embossed, again with  Stampendous Aged Embossing Enamel in aged spice.


Leaky Shed Studios chipboard pieces used:


This is the first banner I've made and I must say, it was so fun!!  I hope you're inspired to give it a try!


Thursday, February 6, 2014

Blog Hop Winner and Layered Chipboard Frames for a Shabby Chic Birthday Card

Hi everyone. It's Tracey back to share a birthday card I've created featuring Leaky Shed Studio Chipboard,
but first I have some exciting news to share that I know you've all been waiting for.

Our design team along with Authentique provided lots of gorgeous Valentine inspiration
during our 3-day Blog Hop, and now we have a winner to announce. 

The winner of this fabulous prize package of Leaky Shed Studio Chipboard:

. . . is . . .

Heather Thompson

Congratulations, Heather!!

Please email your shipping information to
Debbie Sherman at wyscrapper@gmail.com

~ ~ ~ ~ ~ ~ ~ ~ ~

Now for my project details. 

Our family has a birthday to celebrate nearly every month of the year, and I enjoy creating personalized cards to help celebrate these special days. This one is for my sister.

Listen to Your Heart
Shabby Chic Card by Tracey Sabella for Leaky Shed Studio, Chipboard Frames

Tips and Techniques
Shabby Chic Card by Tracey Sabella for Leaky Shed Studio, Chipboard Frames
Leaky Shed Studio has some gorgeous frames. I layered two different frames that fit together perfectly ~ the French Oval Frame and the small Victorian Oval Frame from this set. I heat embossed Fran-tage Embossing Enamel on them in two different colors to coordinate with these lovely BoBunny papers from their "The Avenues" collection.  It can be difficult to adhere slick surfaces like these enameled, layered chipboard pieces, but I find that Helmar 450 gives a strong permanent bond. 

Shabby Chic Card by Tracey Sabella for Leaky Shed Studio, Chipboard Frames
A close up of the flower cluster around the bottom of the chipboard frame.

Shabby Chic Card by Tracey Sabella for Leaky Shed Studio, Chipboard Frames
Another close-up with a better view of the hand-dyed and scrunched seam binding ribbon tied into a double loop bow. I used the chipboard to frame my sentiment which was stamped and embossed.

Shabby Chic Card by Tracey Sabella for Leaky Shed Studio, Chipboard Frames
I used more Leaky Shed Studio chipboard inside my card using another Vintage Oval Frame (smallest in set) that perfectly framed the sentiment printed on my paper. It was also heat embossed with Fran-tage Embossing Enamel. The birthday sentiment was stamped and heat embossed. I just adore distressed edges and use the Distrezz-it-All to achieve these edges.

Shabby Chic Card by Tracey Sabella for Leaky Shed Studio, Chipboard Frames
Leaving you with one final shot.

Leaky Shed Studio Products
French Oval Frame Chipboard
Victorian Oval Frame Chipboard

Helmar Products
Helmar Premium Craft Glue
Helmar 450 Quick Dry Glue
Helmar Fabric Glue

Other Products
BoBunny ~ The Avenues paper collection
Wild Orchid Crafts ~ 25mm Cottage Rose in Mixed Pink and Mixed White/Cream; 15mm Open Roses ~ Deep Ivory
Pebbles ~ Jewel Flower Brads - Happy-Go-Lucky
Prima Serenade ~ White
Darice ~ Ivory Berry Sprig
1/2" Seam Binding - Cream
Lace ~ my stash
Stampers Anonymous - Tim Holtz Clear Stamps ~ French Connection; Urban Grunge
Stampabilities ~ May Your Birthday Be Filled . . .
Donna Salazar for Clearsnap ~ Mixed Media Inx ~ Indigo, Honey
Donna Salazar for Clearsnap ~ Mixed Media Inx Embossing Powder ~ Honey
Ranger ~ Embossing Powder - Clear
Ranger ~ Perfect Medium
Fran-tage Embossing Enamel ~ Aged Ivory, Aged Spice
Ranger ~ Distress Ink - Tattered Rose, Dried Marigold
Donna Salazar for Zutter ~ Distrezz-it-All
Darice ~ Heat Tool
Tim Holtz ~ Grid Blocks

~ Blessings ~
Tracey

Monday, February 3, 2014

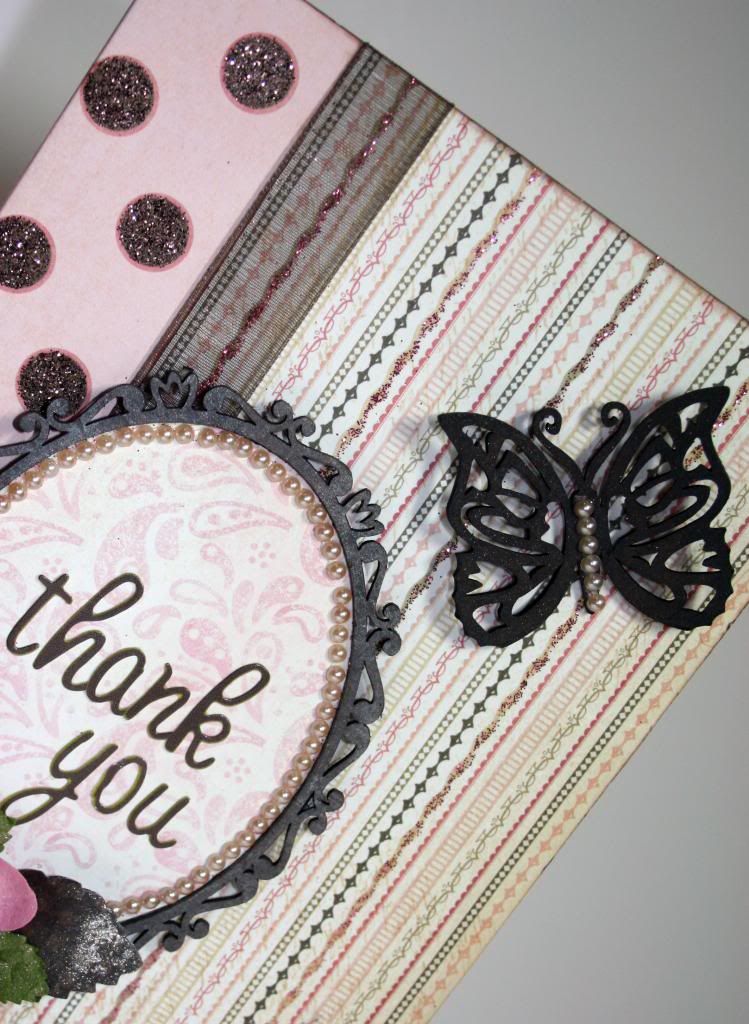
Thank You Card

Hi everyone!  It's Robbie today and I wanted to share a quick Thank You card that I made for a friend.  This was not what I was planning to share today, but my daughter asked me to visit her so I fell behind on getting everything done.  

I actually made this card and am sending it off tomorrow, so I took a photo for today's post.  In case you ever wonder if I actually do love these products, now you know!  I use the chipboard even when it isn't for an assignment.  I could use the Victorian Oval Frames constantly!


I kept the chipboard coloring pretty simple.  I first inked with black chalk ink, layered chestnut over it and gave it a light mist of Glimmer Mist to shine it up a bit.  After it was dry, I added paper to then inside of the frame to match the inside of the card and finished everything off with some sticky pearls.
 

The flower cluster was done with some flowers, punched leaves and ribbon.  Before I attached the flowers and leaves to the cluster, I gave them all a light mist of Glimmer Mist.


Thanks so much for stopping by to see my project!

Supplies Used:  
Victorian Oval Frames
Spring Butterflies Small

Be sure to stop by our Facebook page too!  Share your projects, we love seeing what you are creating with Leaky Shed Studio products!

Friday, January 17, 2014

Birthday Card Featuring Painted Chipbard

Hi, it's Tracey, back to share a card I've created featuring gorgeous Leaky Shed Studio chipboard.

Birthdays are special days to celebrate, and I enjoy creating handcrafted cards for my family for their special days.

Birthday Wishes

Tips and Techniques
I took the one of the small butterflies and soaked it in warm water until it was soft and wet through. Then I pulled each of the wings apart into three layers, leaving the body and antennae intact. I curled up and shaped the layers with my fingers and heat set. I painted with gold metallic paint, then dry brushed with metallic blue paint. 

The Blowing Leaves Frame was painted using a fine tip paintbrush. One of the things I like to do is to swirl two or three similar colors of paint together, but not mix thoroughly. Then, when I paint, I get variations in the colors.

Here's another angle of the butterfly corner.

I stamped the sentiment onto a flag shape I had cut and inked, then added a resin piece and flower to the base.

I cut a Flower Corner into two pieces to layer under the sentiment. I treated it with a quick coat of metallic paint.

I've used another chipboard piece to frame my sentiment inside the card, the medium Victorian Oval Frame. I folded and tucked a piece of ombre organza ribbon on each side. I've painted this frame with more of the gold metallic paint. 

Here's the card at another angle. Behind the sentiment, I have misted then over the mist, stenciled a crackle design. Each of the layers is inked and distressed. To add more texture, I glued a piece of cream mesh ribbon to the back of my sentiment piece, then unraveled it so the fibers would flow across the end of the card,

Leaky Shed Studio Products
Blowing Leaves Frame
Spring Butterfly Small (Set of 3)
Flower Corner
Victorian Oval Frame (Set of 3 - medium frame used)

A full listing of products used will be available
on my blog, Garden of Grace, on Saturday.

I hope you've been inspired to grab some Leaky Shed chipboard and created a card for a special person in your life!

~ Blessings ~