Wednesday, January 28, 2015

Winter Wonderland Layout with Guest Designer, Juliana Michaels

We are so delighted to have the talented
Juliana Michaels
as a special guest designer today.

Juliana grew up in a creative household loving art, design, and making things with her hands. She gives all the credit to her creative mother who loved to paint, sew and draw. Her mother also photographed her daily life and kept all of these photos stored and displayed in photo albums. Nearly 15 years ago she found her true passion in paper crafting and scrapbooking thanks to the combination of being exposed to these creative activities and photographic documentation of her daily life. Since 2008 she has been creating and sharing paper crafting projects on her blog (http://www.17turtles.com/).

She has been a project designer in the paper craft/scrapbook industry since 2007. She has been fortunate to work for many top manufacturers including: BoBunny, Bella Blvd, Elle's Studio, SRM Stickers, Provocraft, Pebbles, and Jillibean Soup. Her projects have been published in a variety of magazines and idea books and she has had projects displayed at the Craft and Hobby Association Trade Show.

Juliana is married to Danny, her best friend and the love of her life. She is also mom to a Golden Retriever named Lincoln and an American Paint Horse named Woody. She has a fondness for coffee, Mexican food, turtles and antiquing. In her spare time she enjoys running, working out, cooking, and reading science and historical fiction.

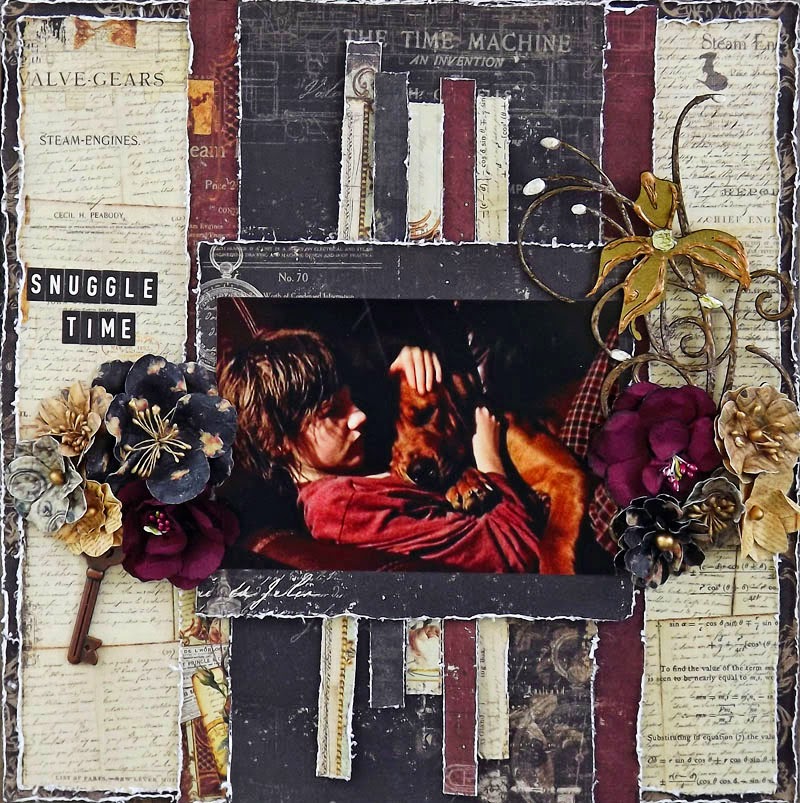
Hi Leaky Shed Studio Fans! I'm Juliana from 17turtles and I'm pleased to be here today to share a scrapbook page I created using one of my favorite Leaky Shed Studio Chipboard pieces. I don't really love the snow, but I love snowflakes. With that being said, the Snowflake Border Large was the perfect piece for embellishing this layout of our sweet Milo playing in the snow last year.

Winter Wonderland Scrapbook Page by Juliana Michaels featuring Leaky Shed Studio Chipboard Snowflake Border Large

I inked the chipboard with Versamark Watermark Ink. To achieve a little bit of dimension, I sprinkled it with white embossing powder, while the ink was still wet, and heat embossed it with a heat gun.

Winter Wonderland Scrapbook Page by Juliana Michaels featuring Leaky Shed Studio Chipboard Snowflake Border Large
The original Snowflake Border is 11 inches long, however, it was too large for my design. My solution? I trimmed the border by cutting off one of the snowflakes. This made it the perfect size to fit in the center of my design and it left me with an extra snowflake to use on another project.

Winter Wonderland Scrapbook Page by Juliana Michaels featuring Leaky Shed Studio Chipboard Snowflake Border Large

It was a pleasure to create and share this layout with you today. Do you enjoy scrapbooking your winter activities? Make sure to check out Leaky Shed Studio for all your winter shaped chipboard needs!

Be sure to stop by Juliana's Blog,
to view more of her gorgeous work!

Leaky Shed Studio Product

Monday, January 26, 2015

experimenting with monoprinting using Leaky Shed chipboard--trisha too

I've been on a monoprinting spree lately, and had some fun experimenting with using Leaky Shed Studio chipboard swirls in the prints.
This would be a great way to create your own backgrounds and coordinating embellishments--here are a couple of the papers:

And then the aftermath, chipboard pieces in coordinating colors--what a bonus, right?

Friday, January 23, 2015

Its time to cuddle with your furbaby - a layout by Laura Gilhuly

Hi everyone!
Laura here today to share a layout of our youngest son and our furbaby!

Our dog really thinks she is a lap dog - shes not - she too big but she tries anyways and we give her cuddles until our laps go numb from under her weight! (about 125 pds I think)


Our youngest seems to be able to withstand her weight longer than the rest of us lol!
And trust me Mia takes full advantage of 'snuggle time'


I used the Leaky Shed Studio - Wildwood Flower
To alter it - I sprayed the flower with mist, then I used liquid pearls om 3 different colors.
I added some vintage gold embossing powder and set it with my heat gun to make it a little more distressed!


and fun a little cluster!

Leaky Shed Products Used


Monday, January 19, 2015

Grungy Steampunk Card by Tracey Sabella

Hi everyone!! It's Tracey here to share this masculine steampunk birthday card I created for our son-in-law. I've been wanting to use the Leaky Shed Studio Hot Air Balloon for some time now and thought it would be fun to go steampunk with it. I've also used the Watch Parts, one of my favorite chipboard sets!!


Tips and Techniques
Often we think about molding paste being used with a stencil. Here, I've brushed Viva's Graphite Special Effect paste randomly over the chipboard, leaving bits of raw chipboard showing through in some places, and other areas with thicker layers of paste. 

The Leaky Shed Studio Hot Air Balloon fit perfectly over this balloon from Prima's Cartographer paper collection, which I fussy cut and adhered to the back of the chipboard. The "basket" is a jewelry finding piece from my stash. For a steampunk edge, I adorned with metal clock hands and mini gears. Some of them were a silver/pewter color, so I heat embossed them with Donna Salazar's Leather Mix'd Media Embossing Powder, which has a coppery metallic sheen. Others were copper and left in their natural state.

The Leaky Shed Studio Watch Parts were heat embossed with black embossing powder and while still hot and molten, sprinkled with Leather embossing powder and reheated giving this rusty metal look.

Another view of the gears. You can see just how much shimmer and depth this embossing powder technique gives.

A close up of the top corner. I like to let embellishments hang off the edges of my cards.

Be sure to check out the fabulous selection of steampunk chipboard that Leaky Shed Studio offers HERE.

Leaky Shed Studio Products

A full product list can be found on my blog,

Thanks for stopping by today!

~ Blessings ~

Wednesday, January 14, 2015

Spring Time Flower Bouquet with Kitsnbitscraps


Hi Veronica here today and I am sharing with you a bouquet of flowers!  Yes I know it is January, which is why I felt like a pick me up and what better way to do that, than with flowers!


I am giving this pretty bouquet of flowers to a good friend just to say "Thank You".  This is a simple and very cute project and it would make a lovely gift for your friends or family.

Here are my steps.


I painted all my Leaky Shed Chipboard pieces white so that any color I decided to give these lovelies would be bright.  Then I used Art Anthology Sorbet paint and Copic Markers alcohol inks to color my blank chip boards.


The last thing I did to my chipboard was to emboss them with clear embossing powder.  Then I took some BBQ sticks and colored them green for the stems.  I used a hot glue gun to attach my stems to my flowers and added a little piece of felt to the backs.


To "fill Up" my bouquet I added some grass sprigs and some felt flowers I made a while ago.  Tie a pretty silk ribbon to a mason jar and voila - a pretty gift.


Leaky Shed Studio Product Used:

Thank you for stopping by today and happy scrapping,


Veronica (kitsnbitscraps)

Monday, January 12, 2015

a little trinket box for a little princess--trisha too

Do you know any princesses?  I recently altered one of those round cheese boxes, the kind the wedges of soft cheese come in, and I think it would be the perfect little trinket box for some girlish treasures. 
Has a nice crackle finish to it, which also protects the chipboard
 The crown is from the Crown Set--this one looked particularly feminine to me, with the swirls.  In real life, as opposed to "I can't photograph glitter" life, it's now quite sparkly and appealing.
See--lots of great shapes to choose from!


Lots of bling, lots of ruffley pink seam binding . . .
Fairly simple piece, but I know a little princess who is going to have fun with this!

Have a wonderful week,
:)trisha

Monday, January 5, 2015

Blessings Box by Tracey Sabella

Hi everyone. It's Tracey here to share my first project of 2015.

I have so many blessings day by day. However, as the year goes by, it's all to easy to overlook them, especially when those challenging days happen. I've created this Blessings Box, so I can write down those sweet blessings and collect them in my box. I've featured the gorgeous Leaky Shed Studio Moroccan BorderOrnate Banner, and Fancy Keyhole.

Blessings Box

Tips and Techniques
The base of my Blessings Box is a 6" square paper mache box. I painted the box and all chipboard pieces with two coats of white gesso. This Ornate Banner was misted with two colors of Lindy's Stamp Gang mist, then decorated with rhinestones. 

I've edged the box with a mix of mica flakes, German glass glitter and microbeads.

The dangling cross is attached by looping cording through the cross and bead then knotted. The cording was then pulled through a gear, then through two holes in the box lid and knotted on the other side.

The box base was layered with strips of sheetrock mesh and stenciled molding paste. I spritzed the textured surface with several colors of Lindy's Stamp Gang mist - allowing to dry between colors. The raised areas and box edges are rubbed with Viva Gold Modeling Cream.

The metal flower was painted with white gesso, except for the rhinestones and dark center. Then when dry, I spritzed with several colors of mist. 

The remaining flowers were misted in the same colors as the box base, then brushed with gesso. I dabbed them with Glossy Accents to adhere chunky glass glitter.

Front view - I cut each of the Moroccan Borders into two pieces, cutting and sanding the cut ends to look like the laser cut ends. I repeated the border on all four sides. The Fancy Keyhole and border are colored the same as the Ornate Banner on the top of the lid.

The cross is a metal charm I painted with gesso and misted.

Here you can see more of the texture and how I added chunky glass glitter around the Moroccan Border

Leaky Shed Studio Products

A full product list can be found on my blog,

Thanks for stopping by today!

~ Blessings ~